


You can export the Fuel BOLs data for the required period into the CSV file. Exported Fuel BOLs data can be sent to a certain email address within the specified schedule.
Before you start receiving the Fuel BOLs data, you need to configure the following settings:
- Grant the permission for configuring export settings to your user.
- Configure the GSAP reports schedule.
You can additionally download the reports data directly from the Export Settings form and perform other actions with the report data. For more information see Additional Actions with the Export Settings Report.
Granting the Permission for Configuring Export Settings to the User
To allow your user to configure export settings for the GSAP reports, you need to grant the Export BOLs Settings form permission to the user.

When the Export BOLs Settings form permission is granted to the user, the Export Settings button becomes available in the Fuel BOLs report. By clicking this button, the user can configure the export settings for the GSAP reports.
You can grant a specific permission to the user in the following two ways:
- Grant a permission to the user's role.
- Grant a permission to the user directly.
For more information on how to grant permissions to roles and users, see Roles and Permissions Management.
Configuring the GSAP Reports Schedule
To configure the GSAP reports schedule:
- Open the Fuel BOLs report. For more information, see Fuel BOLs.
- In the Fuel BOLs report, click the Export Settings button.
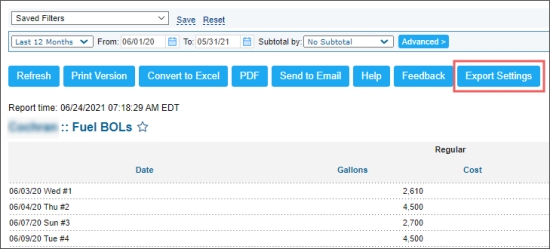
Result: The Export Settings form opens. - In the Export Settings form, specify the following settings:
- In the From and To fields, set the period for which the report data should be exported.
- In the Email for alerts about export errors field, specify an email address at which you want to send notifications about errors that occur during the export process. To specify additional email addresses, click Add email and enter the necessary addresses in the fields below.
- From the Transport list, select the method of data transferring — FTP , SFTP, or Email:

The Export Settings button is available only to the users with the Export BOLs Settings form permission turned on. For more information, see Granting the Permission for Configuring Export Settings to the User.
- If you have selected Email, in the Email field, enter an email address at which you want to send the exported data. To specify additional email addresses, click Add email and enter the necessary addresses in the fields below.
- If you have selected FTP or SFTP, specify the following parameters of the FTP server on which you want to store the exported data:
- Host: Host name of the FTP server.
- Path: Path to the folder in which the exported data must be stored.
- User Name and Password: Credentials that must be used to access the FTP server.
- In the Data period for download(days) list, select the number of days for which the data should be sent.
- In the Schedule Setup section, in the Time list, select the time when the report must be generated per each week day.
- At the top left of the form, click Save.


You may additionally set the following export settings, if needed:
- Number of resubmission retries: Enter the number of attempts that CStoreOffice® must make to send the report to the destination. After the last failed attempt, CStoreOffice® sends an email notification with the error description to the system administrator.
- Waiting in minutes for repeat: Specifies the time interval between attempts to send the report to the destination. If CStoreOffice® fails to send the report for some reason, it waits for the specified period of time and then makes a new attempt.
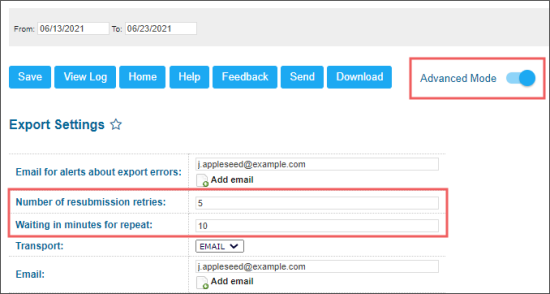

To display and set up these options, set the Advanced Mode toggle into the On position.
As a result, the report is exported into the *.CSV file and sent to the specified email address as it is displayed in the image below.

Additional Actions with the Export Settings Report
You can perform the following actions from the Export Settings report's form using the buttons at the top of the form:
- Save: Saves the configured export settings.
- View Log: Opens the Fuel BOLs Export Log report.
- Home: Switches back to the CStoreOffice® main page.
- Help: Opens the Petrosoft University Portal with the corresponding help section.
- Feedback: Opens the form for creating ticket to the Petrosoft Support team.
- Send: Sends the report to the specified email address.
- Download: Downloads the report directly to your computer.


