


If you cannot use any other method for the Price Book setup, you can populate the Price Book manually. To do this, you will have to enter items data using the Item Tool.
To access the Item Tool in CStoreOffice®, go to Price Book > Items.
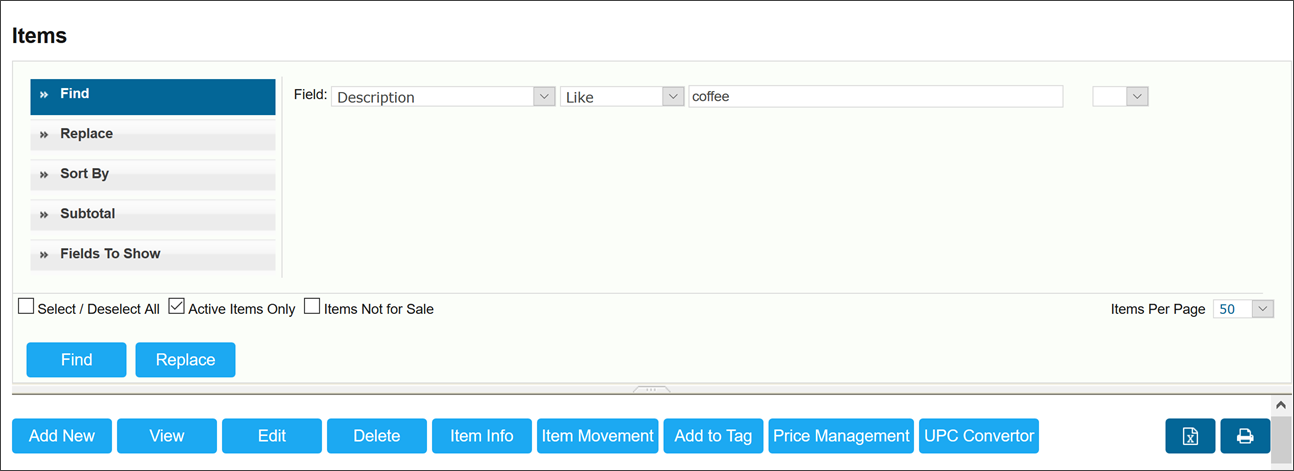
The Find & Replace Tool is the default display in the Items Tool application. This is because the Items Tool is generally used to add, edit or delete items that are selected by using the Find & Replace operation. Click the Items icon to open the Find & Replace Tool.
Items Setup
To go to the Item Setup form, follow the steps:
- In CStoreOffice®, go to Price Book > Items.
- Below the Find and Replace tool, click the Add Item button.
There are two levels that this form can operate on: the account and the station level. You can change from the account to the individual stations by clicking the list at the upper left corner of the Item form. Click the Edit button in the form to change or add new data.
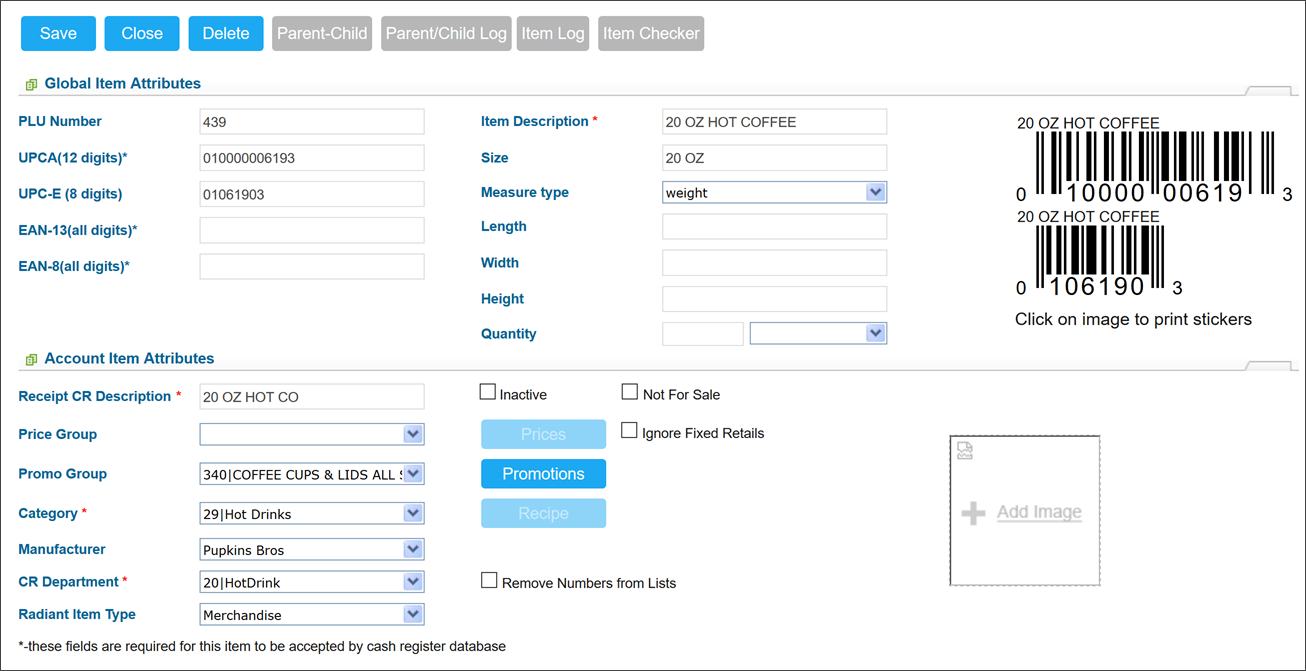
Global item attributes are present in the Global Price Book. These entries cannot be changed once they are entered.
- PLU - you can enter a PLU number in this field. A PLU is an arbitrary identification number used to track sales of items without a UPC code such as fountain drinks and so on.
- UPC – 11- or maximum 12-digit UPC code of an item.
- UPC – E - reduced UPC code type E. This is usually 7 digits. If you have an 8-digit code without the first 0, the first digit shall be dropped. The code can be also 6- digit, without the first and the last numerals.
If an item does not have a UPC code, the system will assign it an internal ID number, and notify you of the number when the item is saved to the database. The internal ID number can be used just like a UPC number: the item can be scanned, and you can print stickers containing the number.
- Item Description - long description of the item.
- CR Item Description - item name in the cash register. It can be up to 10 characters.
- Size - size of the item.
Press ENTER on your keyboard after filling in the PLU, UPC-A, UPC-E or description to populate the entire item set-up page.
Account item attributes will only show up if you are in the account mode.
- Receipt CR Description - this is the description that will appear on the receipt that the cash register prints.
- Item State - the manager can use the check boxes to classify items not currently available.
- Inactive – item is not active.
- Not for Sale – item is a non-sales item such as store supplies and so on.
- Children Summary Retail - this section appears if the item has a parent or a child. Our system arranges items according to the parent-child principle. The item bulk packing is, as a rule, parent for smaller packaging or item units.
EXAMPLE: A cigarette carton is parent for the pack. Click Edit and enter the UPC for parent or child in the Children Summary Retail field. The system will find and automatically assign child status to the item being set-up, and relate it to its parent (or vice versa.)
Items must be in the system in order to be assigned parent or child status. If the item has a child, its retail will be equal to the total retail of its children when it is taken to inventory.
- Price Group - this field allows you to assign the item to a price group.
- Promo Group - this field allows you to assign the item to a promo group.
- Category - this field allows you to assign the item to a category.
- Manufacturer - this field allows you to append the manufacturer or producer to the item entry. If CStoreOffice® knows the item code of the manufacturer, it will be chosen automatically upon saving the item.
Station Level
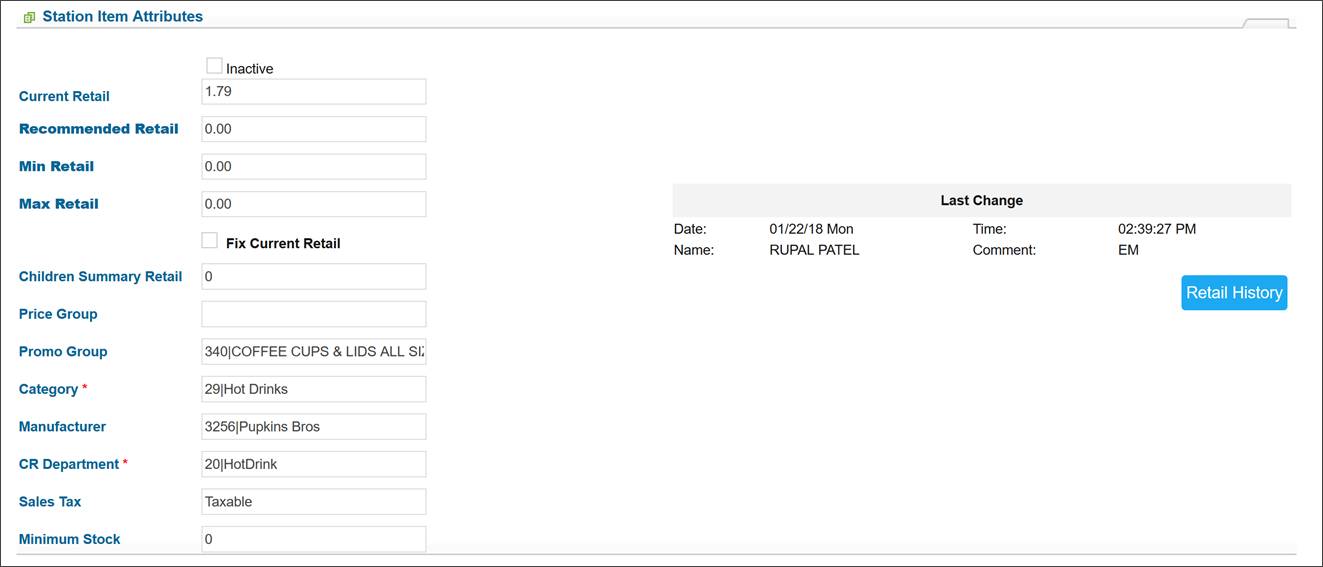
- Current Retail - current retail for this item at your station. It can be changed manually if it is not set in a Price Group.
- Fix Current Retail - select this option to fix this price so that it may not be overridden.
- Minimum Stock - this is the minimum remaining in stock before it will automatically reorder.
- Price Group - this field allows you to assign the item to a price group.
- Promo Group - this field allows you to assign the item to a promo group.
- Category - this field allows you to assign the item to a category.
- Manufacturer - this field allows you to append the manufacturer or producer to the item entry. If CStoreOffice® knows the item code of the manufacturer, it will be chosen automatically upon saving the item.
- CR Department - this field allows you to assign the item to a cash register department
- Sales Tax - if the department, to which the item is assigned, is taxable, this field will have an inscription “Taxed”.
The Purchases and Cost section is the section where data for the vendor supplying this item is displayed.
- Vendor - name of the supplier’s company.
- VIN (Vendor Item Number) - number of items in the vendor’s system.
- Unit in Case - quantity of the item in the packing.
The Related Information section lets you perform additional actions:
- Click Reports to go to the Reports section.
- Click Item History to see a report detailing all purchases and sales of this item at your store.
To edit an item, click Edit to go to the editing field. Enter data into any of the fields to go to item setup for that product. You can enter PLU, 11 or 7-digit UPCs or the product description to locate the proper item and open item set-up for that item.
Vendors
The purpose of the Vendors tool is to add new vendors and edit information for those already entered. There are two levels that the Vendor tool can operate on, and they use different forms to enter the data.
- Account level - manages vendors for the entire account.
- Station level - manages vendors for an individual station.
To enter a new vendors, follow the steps:
- In CStoreOffice®, go to Vendors > Vendors List.
- In the top menu, click the Add New button.
Once entered, a venders name cannot be changed, you must create a new vender with the new name.
Account Level
Items in the Account Level Vendor form include:
- Preferred MOP - method of payment used for this vendor.
- Name - name of the vendor.
- Abbreviation - abbreviation assigned to the vendor.
- State, City, Zip code, Phone - data for the office location of the vendor.
- Contact Person - person who serves as you contact at the vendor office. This is usually your sales rep.
- Account Number - number of your account with the vendor.
- Terms - payment terms can be added here.
- Vendor types - vendors can supply fuel, store items or services to you. Specify vendor type to facilitate accurate vendor lists in the Data Entry and Price Book sections of the site. Vendors can be labeled any of the following types:
- Merchandise - if you select this check box, the vendor will appear in all lists and forms related to the store.
- Fuel - if you select this check box, the vendor will appear in all lists, in all forms related to your petroleum products.
- Expenses - if you select this check box, the vendor will appear in all lists and forms related to expenses.
- Lottery - if you select this check box, the vendor will appear in all lists, in all forms related to your lottery games.
- Use Negotiated Cost in Invoices - if you mark this field, the negotiated cost will be applied to the items from this vendor.
- Apply EDI Suggested Retail - allows the user to take the suggested retail price included in EDI invoices submitted by this vendor.
- Stations - stations in the account selling the items from this vendor.
Station Level
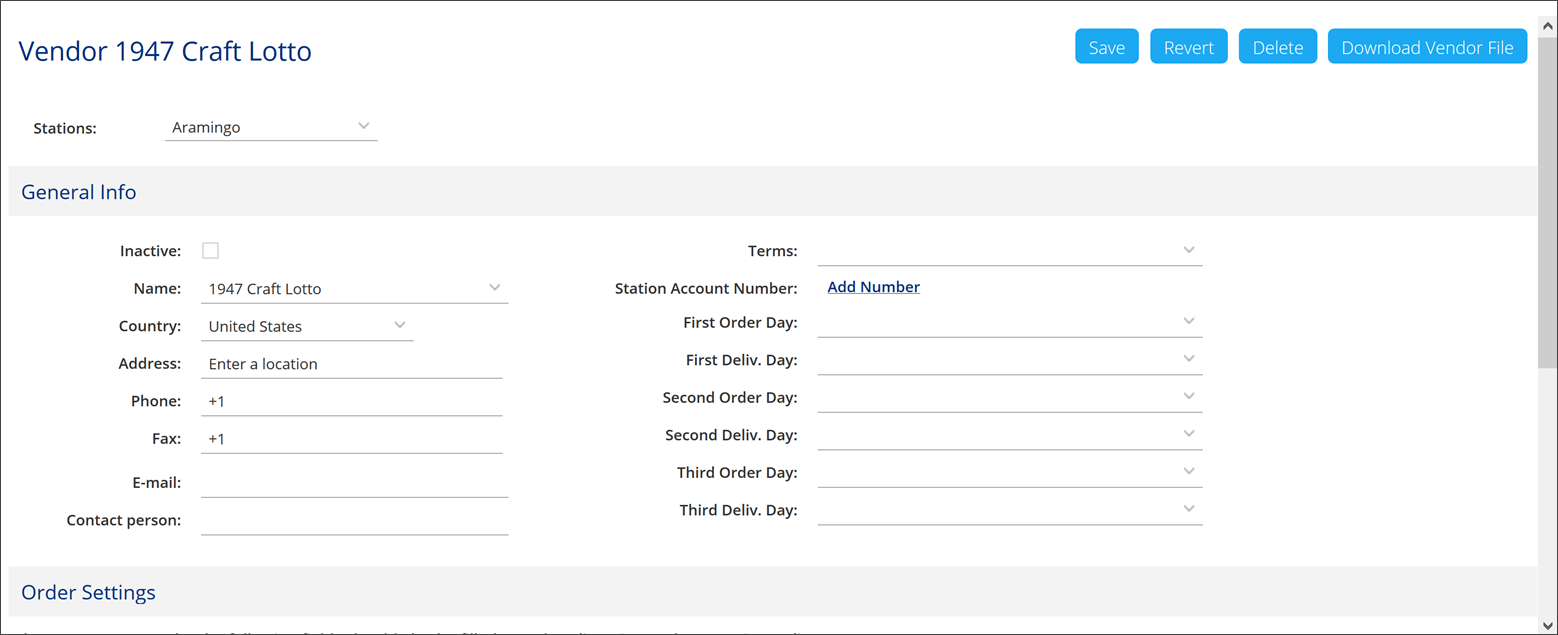
Items in the Station Level Vendors form include:
- Show Inactive Vendors - default display is active vendors only. Select the Show Inactive Vendors check box to view the full list of vendors available at the account. To reactivate an inactive vendor, click Edit and clear the Inactive vendor check box.
- Name - name of the vendor.
- State, City, Phone, Fax, E-mail all mean the data for the office location of the vendor.
- Contact person: - person who serves as you contact at the vendor office–usually your sales rep.
- Station Account Number - number of your account with the vendor.
- Terms - is where you can enter comments for the given vendor.
- Order & Delivery Days are the days of order and delivery and are adjusted in pairs. Setting up order and delivery days will generate a notice in Tasks to remind you to order from a given vendor (or expect delivery.) Setting order and delivery days also helps to generate the Order Report in the Reports section to help you automate ordering.
- Vendor Types - vendors can supply fuel, store items or services to you. Specify vendor type to facilitate accurate vendor lists in the Data Entry and Price Book sections of the site. Vendors can be labeled any of the following three types:
- Merchandise - if you mark this field, the vendor will appear in all lists and forms related to the store.
- Fuel - if you mark this field, the vendor will appear in all lists, in all forms related to your petroleum products.
- Expenses - if you mark this field, the vendor will appear in all lists and forms related to expenses.
- EDI Setup – select the Enable EDI box to start CStoreOffice® looking for EDI form this vendor. This also requires that the Station Account Number be correct.
Categories
Categories are used for reports in CStoreOffice®. They are not uploaded to your register. All departments are members of a category. A category can contain multiple departments.
For example, Online Lottery and Instant Lottery departments are both members of the Lottery Category.
You will notice that the category field does not hold a lot of data. This is because the field is just a container that CR Departments are placed into. All other information is kept in the Department field instead.
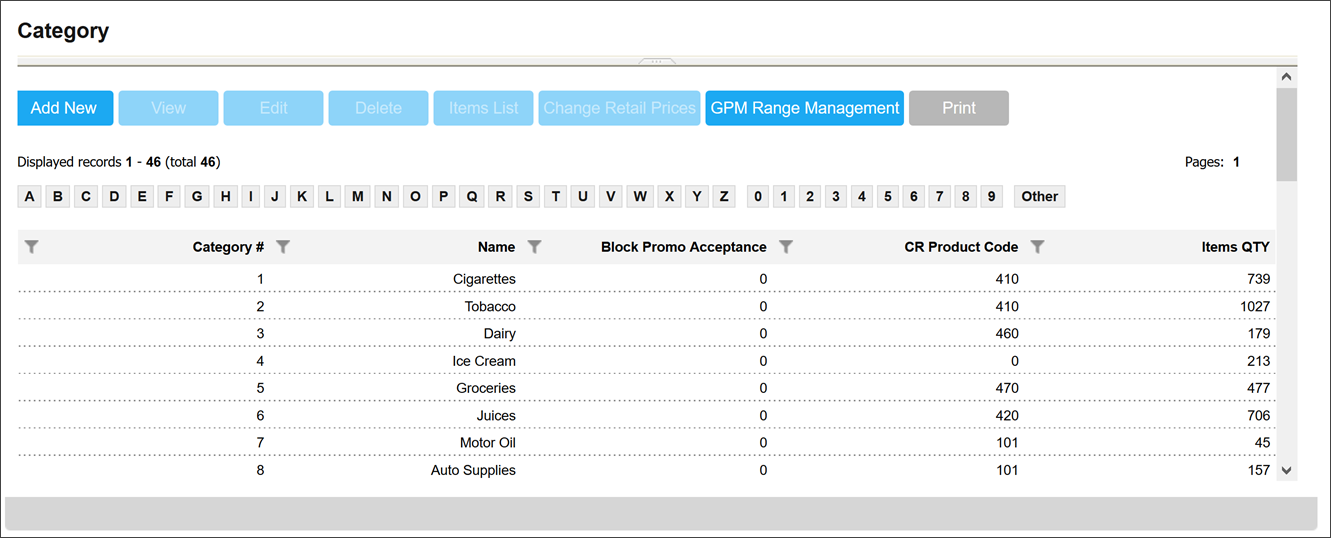
You can work with categories by accessing the Category form. You can add a new category, edit or delete a category, or select a category and view the list of items included in it.
The items that are in the category form are:
- Category ID - number of the category.
- Category Name - name of the category.
- Category Number - category ID in your system.
- Description - details about the items included in the category are displayed in this field.
- Block Promo Acceptance - blocks the category from being used in various promotions.
CR Departments
Cash register departments are used to separate sales data in the register into logical groups to make tracking and reporting sales data easier. Every cash register must have at least one department in order for it to function. Departments are used to determine if tax should be charged when the item is sold.
Departments are members of Categories.
By using the CR Departments tool, CStoreOffice® customers can create, edit or delete their own CR departments. Specific items can then be assigned to CR departments using the Items tool.
To access the CR Departments tool, in CStoreOffice®, go to Price Book > CR Departments.
Each item in your Price Book must be assigned to a department. This is so that the data can be referenced to in reports. Items will not be transferred to your register unless you give them a CR department.
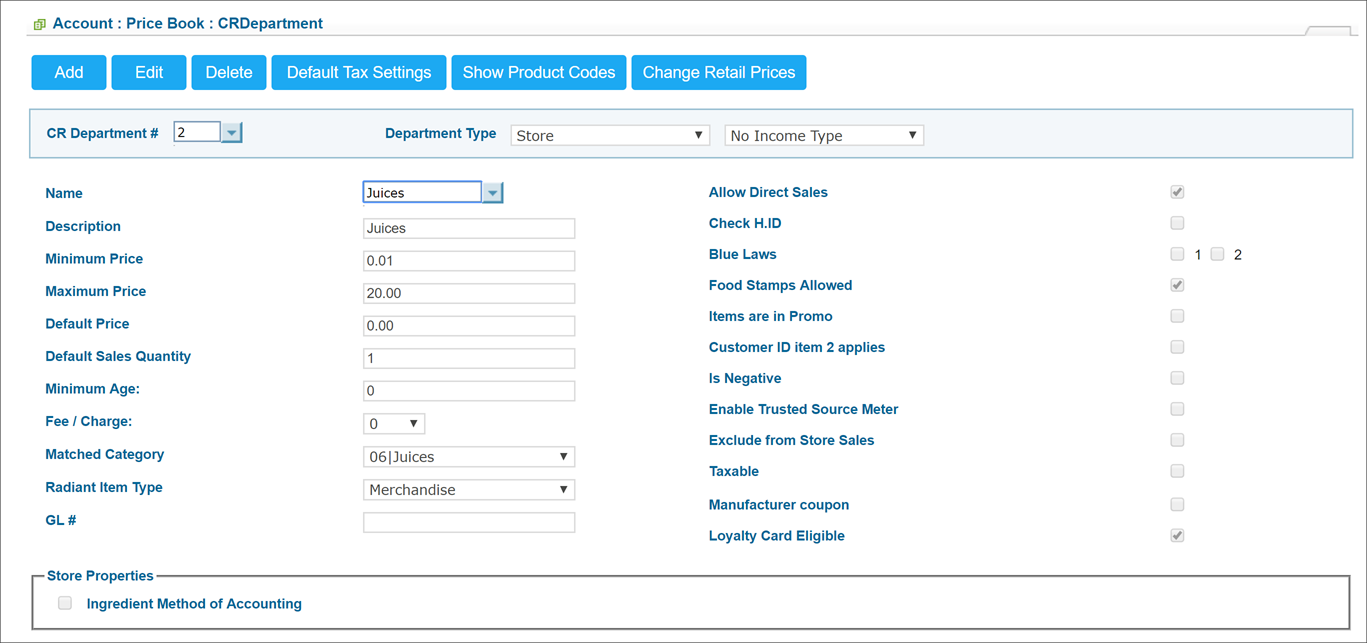
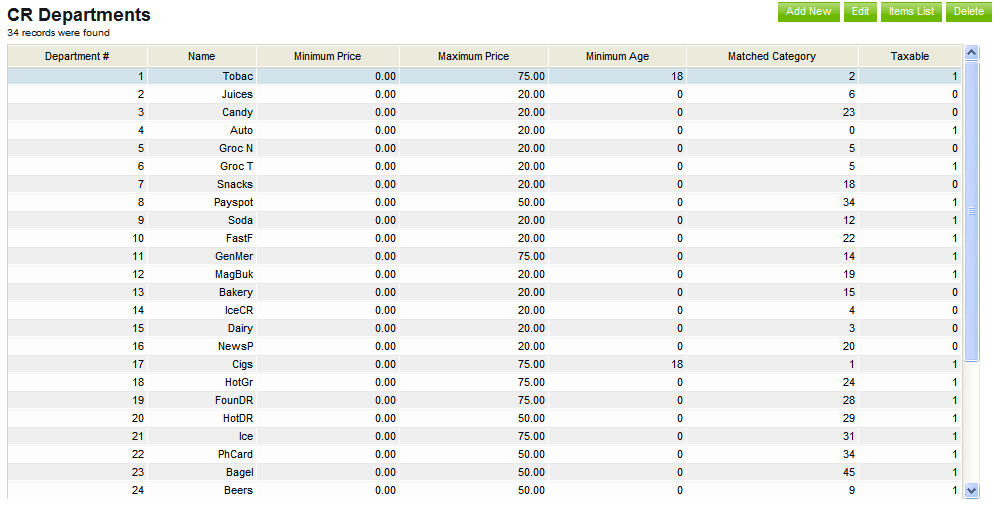
Items in the CR Department form include:
- CR Department# - number of the department. It can be selected from the list or can be entered manually
- Taxable - displays whether a item is taxable and if the system is to use Tax 1 or Tax 2
- Name - name of the department.
- Minimum Price - minimum selling price.
- Maximum Price - maximum selling price.
A good precaution to keep from accidentally entering a price that is very high or very low is by entering a minimum and maximum price in this form.
- Default Price - default selling price for the items in the department.
- Default Sales Quantity - usual number of items sold per purchase in this department
- Minimum Age - minimum age restriction for customers purchasing the item (e.g., cigarettes and alcoholic beverages.)
- Description - name of the department that is displayed in the cash-register. The limit for a description is 10 characters.
- Allow Direct Sales- permit direct sales for the department.
- Check H.ID - check of the customer’s ID documents is required for this department (e. g., cigarettes and alcoholic beverages.)Generally this field will only be used if the minimum age checkbox has also been selected.
- MA Sales - refers to sales of store purchases using the ingredient method of accounting. (Use this method for bakery, fountain, hot drinks and so on.) Store purchases are entered in at cost value, not retail. Retail value will be determined by the related department sales found in the closing register tape.
- Matched Category - this tool allows the user to place a given department in a certain category that CStoreOffice® uses for reporting purposes.
- Items are in Promo - determines whether the department includes promos or not.
- Food Stamps Allowed - turns on accepting food stamps.
- Is Negative - turns on negative values.
Income Type
This section of the CR Department form specifies the income type for a given CR department. This information is used to separate inside store sales from the other items sold in the store such as Lottery and Money orders.
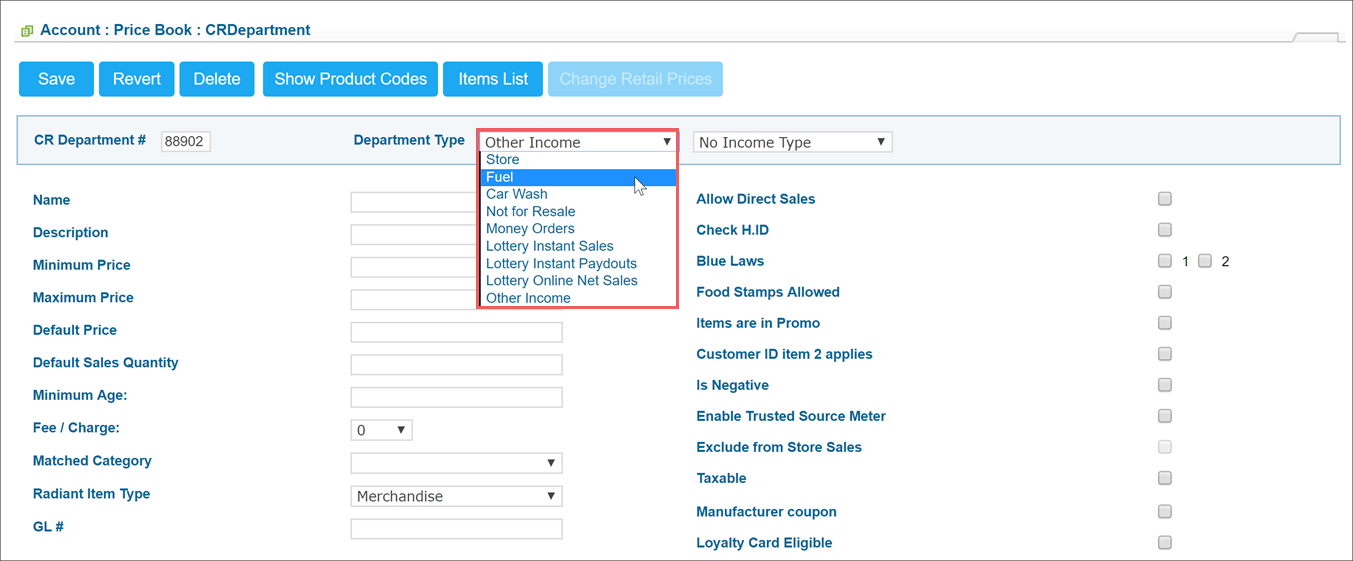
The following types are supported:
- Store
- Fuel - department set up for fuel sales.
- Car Wash - specific car wash department.
- Not For Resale - marks the departments used for store supplies, etc.
- Money Order - specific department used for account on money ordering sales.
- Lottery
- Lottery Sales
- Lottery Online Sales
- Lottery Payouts
- Other Income - sets up a department for services unrelated to inside store sales, such as rest stop showers, Western Union and so on. In the Related Information section, there is a tool that allows a manager to designate an additional type of custom income.
Select one of specific lottery departments used for processing lottery games & payouts only, or choose Store to mark the department as a non-lottery department.


