


Item product codes can be configured in CStoreOffice® at the following levels:
- At the department level: It is a common way to configure the item product codes for all items in the department at once.
- At the item level: This way to configure the item product codes for each item separately is available only for the Bulloch and NCR cash registers.
- Automatically: When items uploaded to CStoreOffice® from EDI invoice received via ABC parser.
In case neither of the levels above are configured, the default value from the cash register is applied to the item product codes. The default CR product code value is equal to 0 and can be changed in the Cash Register form > Shared Options section. For more information, see Configuring Product Codes Settings for Cash Register.
Configuring Product Codes Settings for Cash Register
To configure the product codes strategy for the cash register connected at your station:
- Log in CStoreOffice® using the system role.
- Go to Data Entry > Dashboard > Station Options > Cash Register.
Result: The Cash Register form opens for the current station.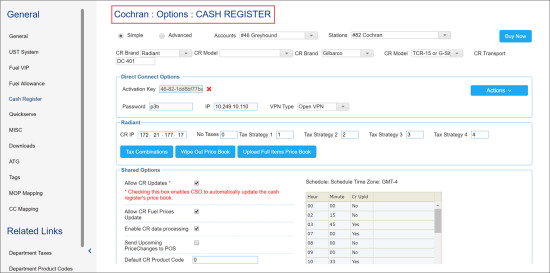
- In the Cash Register form, go to the Shared Options sections, and then do the following:
- In the Default CR Product Code field, enter the product code that should be sent to the cash register in the following two cases:
- The CR Department value is not set for the item.
- The CR Department has no product code.
- In the Apply CR Product Codes section, select the level, from which the item product codes should be sent to the cash register:
- By Departments: Select this level if you need to send the item product codes at the department level.
- By Items: Select this level if you need to send the item product codes at the item level.
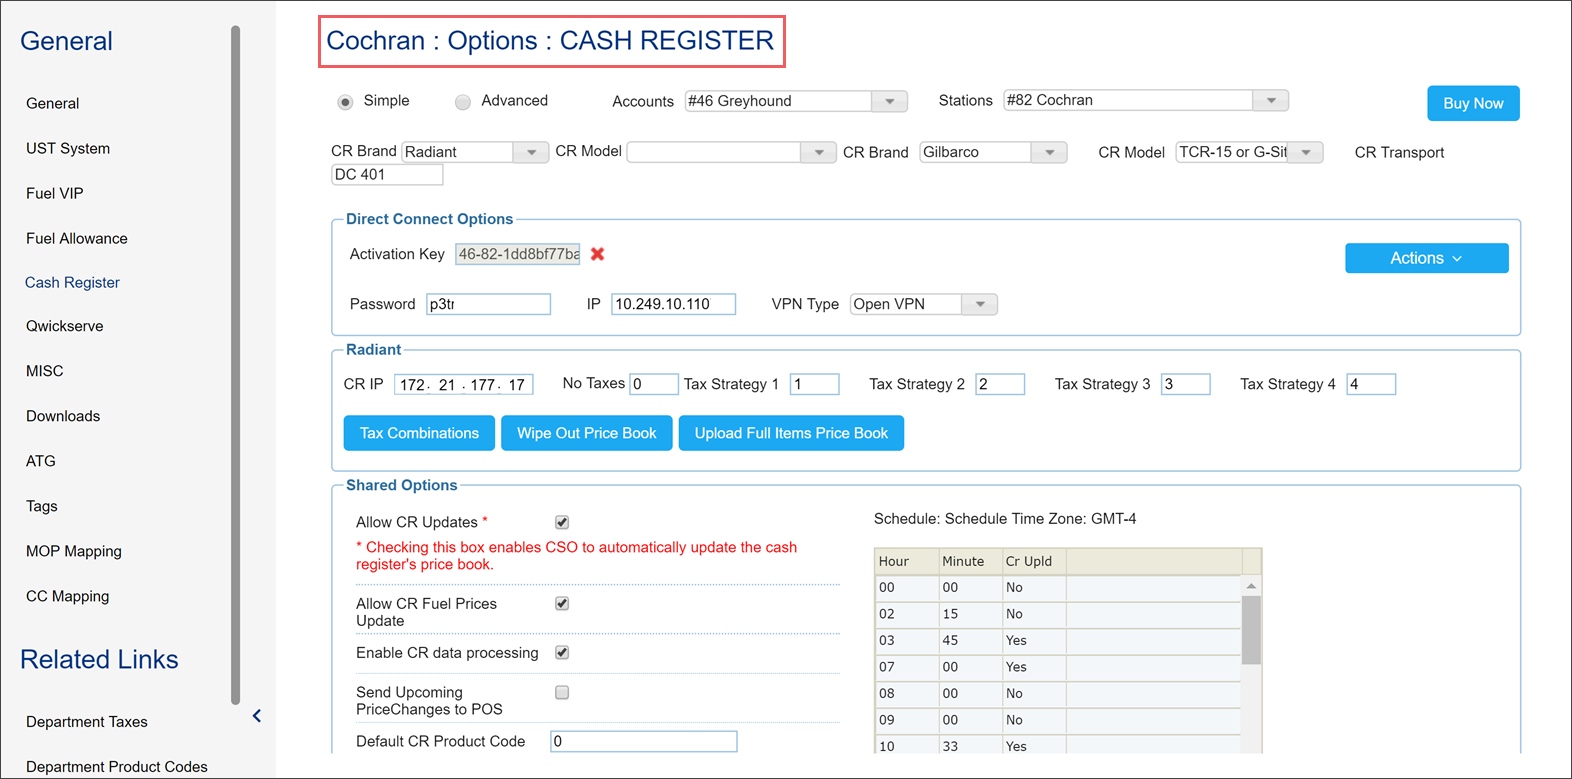
Only numeric values are supported.
The settings in the Apply CR Product Codes section are supported only by the Radiant and NCR cash registers.
- At the bottom of the Cash Register form, click Save.
Setting Up Item Product Codes
You can set up the product codes for the items in at the following two levels:
- At the department level
- At the item level (available only for the Radiant and NCR cash registers)
Setting Up Item Product Codes at Department Level
If you need to apply product code to all items included into one CR department, you can set up a product code for the whole department at once.
To set up item product code at the department level:
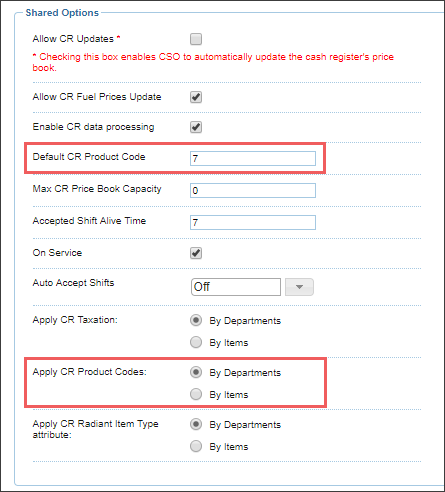
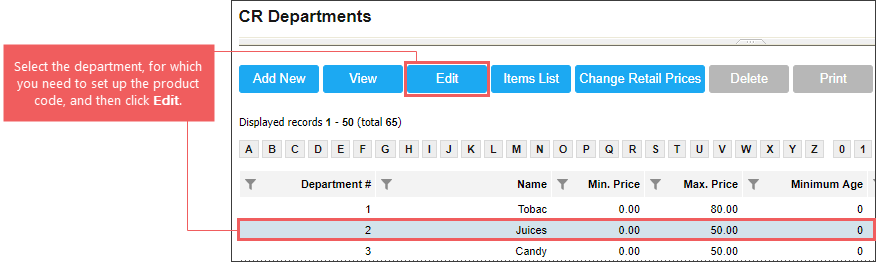
- Go to Price Book > CR Departments.
Result: The CR Departments list opens. - Select the department, for which you need to set up taxes and then click Edit.
Result: The CRDepartment setup form opens. - In the CRDepartment setup form, go to the Related Information section and then click Department Product Codes.
Result: The Department Product Codes report opens. - Set the product code for the department you need. Only numeric values are supported. For details, see Department Product Codes report.
- Make sure the department product code is saved. Do the following:
- At the top of the CRDepartment form, click Show Product Codes.
Result: The department product codes for all stations on your account are displayed at the bottom of the form. - Find your station and in the Code# column, check your department code.

Setting Up Item Product Codes at Item Level
This feature is supported only by the Radiant and NCR cash registers.
If you need to apply to one separate item the product code that is different from those configured for the whole CR Department, you can adjust the item product code in the item's editing form.
Product codes for specific items can be set up using one of the following methods:
You can adjust the taxes for the specific item only if the item level is set for the station's product codes settings. For details, see Configuring Product Codes Settings for Cash Register.
Setting Up Product Codes by Locations
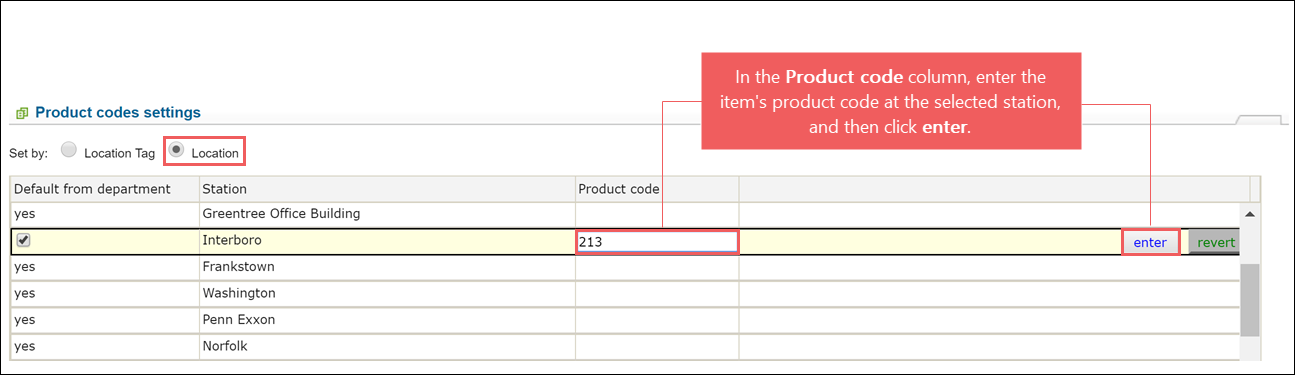
By default, product codes for specific items are set up by location. This method can be used if you want to specify product codes for some item in a granular way, that is, individually for every station.
To adjust the product codes for the item by location:
- Go to Price Book > Items.
Result: The Items list opens. - In the Items list, select the item, for which you want to adjust the product codes, and then click Edit.
Result: The item's editing form opens. - In the item's editing form, go to the Product codes settings section, and then expand it.
- In the Product codes settings table, do the following:
- Check the Set by field and make sure that the Location option is selected.
- Select the station, for which you want to change the item's product codes.
- On the right of the station's row, click the edit button.
- In the Product code column, enter the product code value. Only numeric values are supported.
- On the right of the station's row, click the enter button.
The edit button is disabled if the department level is set for the station's product codes settings at Data Entry > Dashboard > Station Options > Cash Register. For details, see Configuring Product Codes for Cash Register.
- At the top right of the item's editing form, click Save.
Setting Up Product Codes by Location Tags
If necessary, you can set up product codes for specific items by location tags. This method can be helpful if you assign some tag to several stations and want to specify the same product code for them at once.
To adjust the product codes for the item by location tag:
- Go to Price Book > Items.
Result: The Items list opens. - In the Items list, select the item, for which you want to adjust the product codes, and then click Edit.
Result: The item's editing form opens. - In the item's editing form, go to the Product codes settings section, and then expand it.
- In the Product codes settings table, do the following:
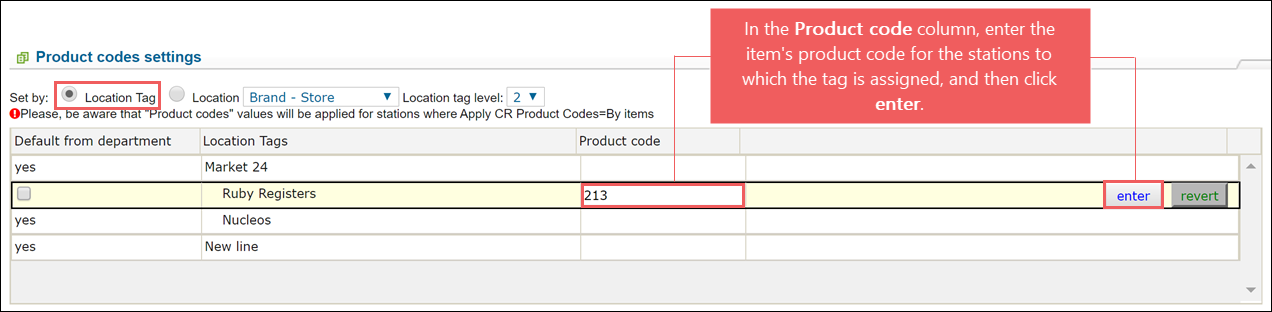
- In the Set by field, select Location Tag.
- In the list on the right, select the parent tag (criterion) by which the stations, for which you want to adjust the product code, are grouped.
- In the Location tag level list, select the level in the tags tree hierarchy at which you want to adjust the product code.
- In the Product code settings table, select the tag assigned to the stations for which you want to adjust the product code.
- In the Product code column, enter the product code value. Only numeric values are supported.
- On the right of the station's row, click the enter button.
The edit button is disabled if the department level is set for the station's product codes settings at Data Entry > Dashboard > Station Options > Cash Register. For details, see Configuring Product Codes for Cash Register.
- At the top right of the item's editing form, click Save.


