


To populate the dashboard and start working with it, you need to set up vendors and ordering data in the system. Perform the operations listed below.
- Create a new vendor
- Set up the orders and delivery dates
- (Optional) Enable automatic merchandise ordering
- Assign the minimum stock for all items for the vendor
Step 1. Create a New Vendor
To start off, you need to create a new vendor from whom you will be receiving items in the system. You can launch the process of the vendor creation directly from the Merchandise Orders dashboard.
To create a new vendor:
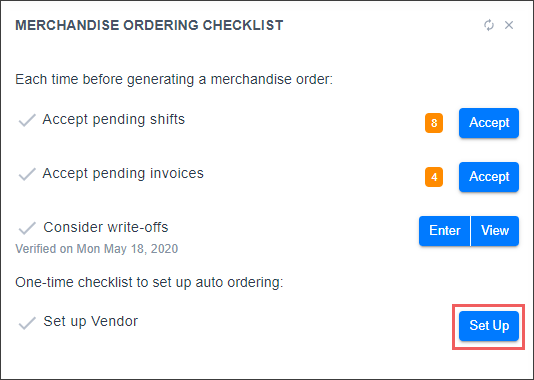
- In the Merchandise Ordering Checklist widget, to the right of the Set up Vendor label, click Set Up.

Result: The New Vendor form opens.
- Configure the vendor settings at the account level. For details, see Setting Up Vendors.
Step 2. Set Up the Orders and Delivery Dates
You need to specify the schedule when you will create orders and get items from the vendor. The orders and delivery dates are configured per location.
To specify the orders and delivery dates:
- At the top of the vendor form, from the Stations list, select the location for which you want to configure the schedule.
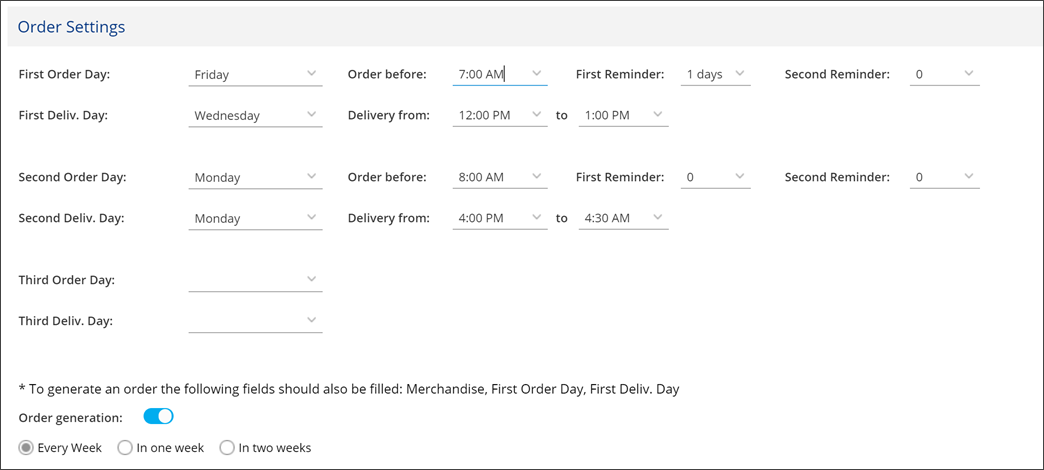
- In the Order Settings section, from the First Order Day list, select the day of the first order. From the Order before list, select the day when the order must be placed and set up the reminders. CStoreOffice® will use these settings to display the order events and reminders in the Merchandise Orders dashboard.
- From the First Deliv. Day list, select the day of the first delivery and use the Delivery to... from lists to set up the delivery time.
- Proceed with the second and third order and delivery days in a similar manner.
- At the top right of the form, click Save to save the changes.
Step 3. Enable Automatic Merchandise Ordering
This step must be performed if you want CStoreOffice® to automatically generate orders for the vendor. Automatic merchandise ordering can be enabled for primary vendors for the location.
If you are planning to create orders manually, skip this step.
To enable automatic merchandise ordering:
- In the vendor form, in the Order Settings section, set the Order Generation toggle to the On position.
- Specify how often the orders must be generated:
- Every week
- In one week
- In two weeks

- Set the ordering schedule, if needed. For details, see Configuring Vendor Ordering Settings.
- At the top right of the form, click Save to save the changes.
Step 4. Assign the Minimum Stock for Items
At the last step, you must specify the minimum stock value for each item you are planning to purchase from the vendor.
To specify the minimum stock value for items:
- In CStoreOffice®, go to Price Book > Items.
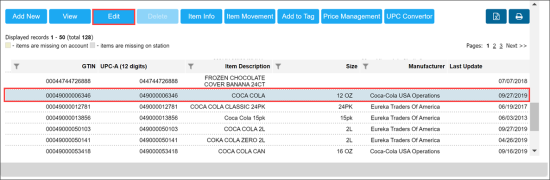
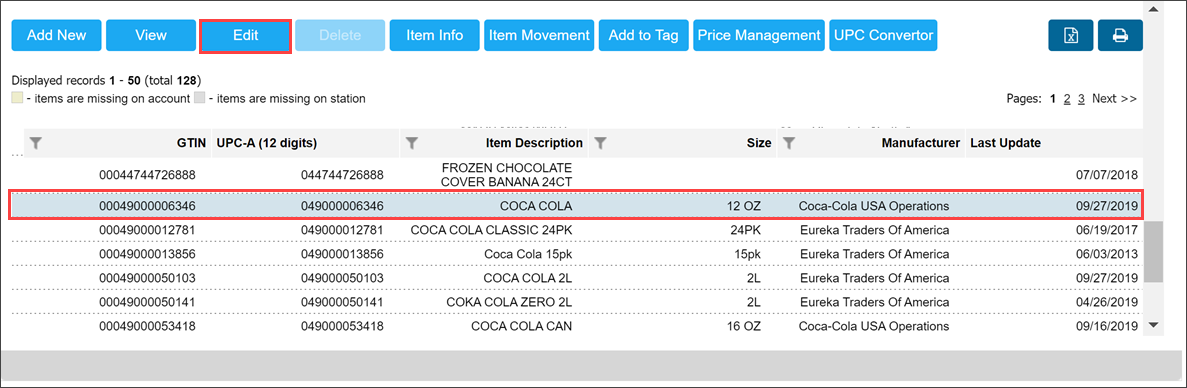
- Use the operational panel to find the necessary item.
- In the items list, select the item and at the top of the list, click Edit.
- In the item form, scroll down to the Inventory section and click to expand it.
- Click the Reorder Quantity column for the necessary location and specify the minimum stock value for the item for this location.

- At the top of the form, click Save to save the changes.

You can now get back to the Merchandise Orders dashboard, refresh data in it and start working with merchandise orders.


