


With the Import PB from the Cash Register module, you can pull items data from the cash register and populate the Price Book with this data. The Import Tool imports such items data as UPC number, retail price, description, association with the CR department and so on.
Items data can be imported in two ways:
- Automatically: You can load items data from the Price Book raw data located at the Cloud Storage.
- Manually: You can import items data from a file in the XML format.
During the setup process of the first location on the account, all items are imported into CStoreOffice® together with all linked items for the following cash registers:
- Verifone Sapphire
- Verifone Commander
- Bulloch BT9000, Esso
- Gilbarco Passport
For all next locations on the account, linked items are imported from the cash register only for those items that did not have linked items before. All linked items that were imported during first location setup process are not overwritten by new values, if any.
You may import later on only linked items, if any. For more information, see Importing Linked Items.
Importing Items Data from CR
To import items data from the cash register to the Price Book in CStoreOffice®:
- From the CStoreOffice® home page, go to Price Book > Import Tool.
- In the Import PB from CR section, select Import Items from CR.
Result: The Import Items from CR form opens.
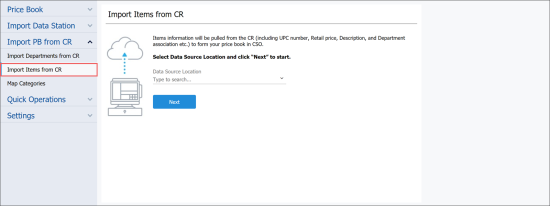
- From the Data Source Location list, select a location from which you want to import items data.
To quickly find the necessary location, in the Type to search field, start typing the location name. The Import Tool will display all variants that match the name you enter.

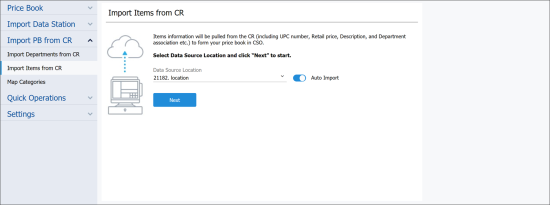
- If you want to import data automatically, leave the Auto Import toggle in the On position and click Next.
To import items data automatically, the raw Price Book data from the cash register must be stored at the Cloud Storage in the conexxus 3.5 format.
If you want to import data from an XML file, set the Auto Import toggle to the Off position, click Browse and select the file from which data must be imported.
- Click Next.
- At the Items to Import step, select check boxes next to items whose data you want to import.
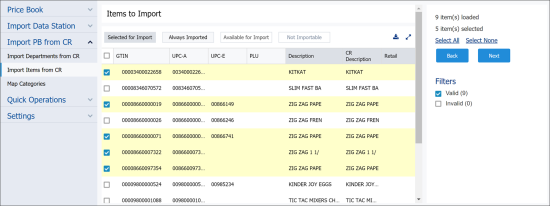
- Click Next.
- If the draft contains fields with empty values, you can specify how these values must be processed during export. At the top of the mapping results form, select the rule by which empty values must be exported:


The Import Tool validates the imported data and filters items as valid or invalid. For more details, see Validating Objects Data.

- Skip empty values: Select this option if you do not want to export empty values to the destination. This option is selected by default.
- Update by empty values: Select this option if you want to replace existing values in the destination with empty values exported from the source.
![]()
- Click Next.
- At the PB Differences step, review the differences between the Price Book items in CStoreOffice® and at the cash register:
- Items that exist only in the Price Book at the cash register and must be copied to the Price Book in CStoreOffice® are marked green.
- Items that exist only in the Price Book in CStoreOffice® and must be updated with data from the Price Book at the cash register are marked red.
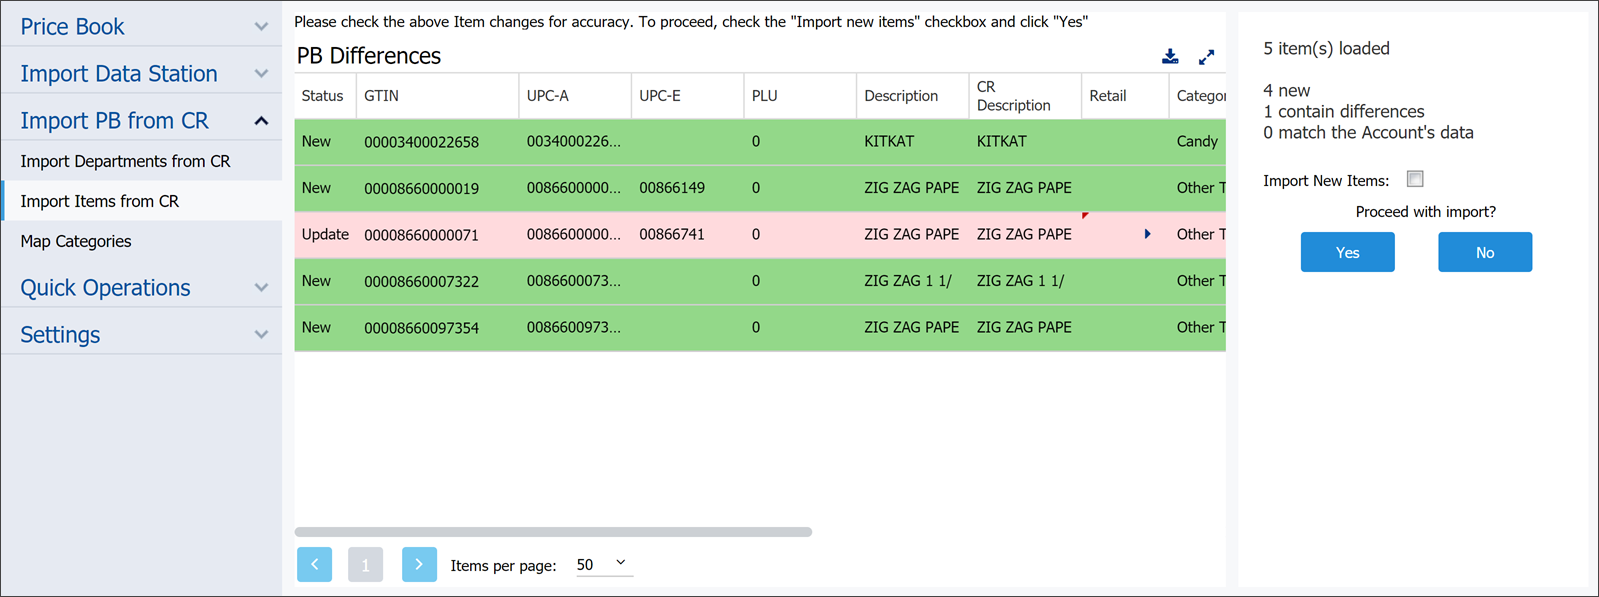
- In the Proceed with export section, click Yes.
Result: The Price Book items from the cash register are imported to the Price Book in CStoreOffice®.
Mind the following:
- If you import new items to the Price Book, the imports all fields for such items.
- If you import items that already exist in the Price Book, the imports only values in the Retail field for such items.
If other users access the Cash Register Update Manager while the Price Book data is being synchronized, they will not be able to accept item changes until the synchronization process finishes.


