


This section consists of the following subsections:
About Buy X in Period, Get Y Free Promotion
The Buy X in Period, Get Y Free enables customers to get a certain amount of items free of charge for purchasing a predefined number of items within the specified period.
This discount will be applied with the next transaction after certain amount is reached. This discount is applied automatically when the customer's phone number is provided and does not need the confirmation from the customer's side.
Setting Up Buy X in Period, Get Y Free Promotion
To set up the Buy X in Period, Get Y Free promotion in CStoreOffice®:
- Go to
- At the top left of the Promotions form, click Add New.
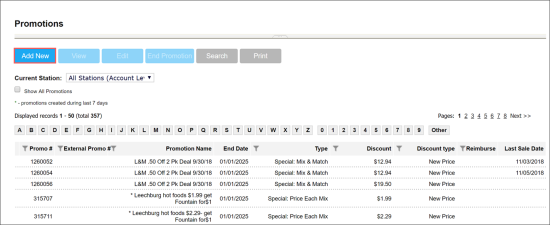
Result: The promotion setup form opens. - In the promotion setup form > promotion header section:
- In the Promotion Name field, enter the name for the new promotion.
- In the Receipt CR Description field, specify the promotion description that must be displayed on cash register receipts. The name length must not exceed ten characters including spaces. By default, the promotion name is displayed in this field.
- In the Promotion Type list, select Buy X in Period, Get Y Free.
Result: The promotion default settings are uploaded in the How much? section according to the selected promotion type. - In the Loyalty Program field, select the loyalty program for the promotion. If the corresponding loyalty program is not configured yet, click Add New and set it up.

For more information on how to configure the loyalty program, see Creating Loyalty Programs.

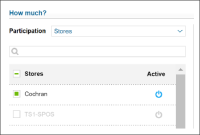
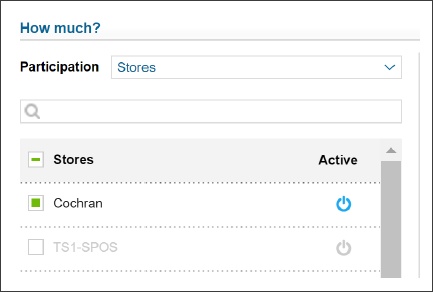
- In the promotion setup form > How much? section:
- In the Participation list, select the type of objects for which the promotion must be activated: Stores, Division, Company, and so on.
- In the list below, click the power icon to the right of the objects that are to activate the promotion.
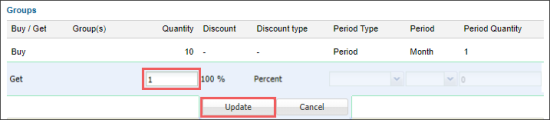
- In the promotion setup form > How much? section > Groups subsection, set up the promotion's basic parameters:
- In the Buy row, set up the items quantity a customer must purchase for the discount to be applied and the promotion period:
- Click the Buy row.
- Go to the What is included? section and add to the Buy Group(s) the items a customer must purchase for the discount to be applied.
- Go back to Groups. Double-click the Buy row and configure the following promotion settings:
- In the Quantity field, enter the amount of items to be purchased within the specified period.
- In the Period Type list, specify the period during which the specific amount of items should be purchased.
To left the period undefined, select Not limited. To set the period, select Period and proceed with the next period settings.
- In the Period list, select Day, Month, or Year.
- In the Period Quantity field, enter the amount of days, months, or years during which the specific amount of items should be purchased. - Click Update.

- Double-click the Get row and set up the following fuel discount parameters:
- In the Quantity field, enter the amount of items that will be given free to the customer.
- Click Update.
- In the Reimbursement from Vendor section, configure the reimbursement from the vendor:
- In the Reimburse list, select the vendor who will reimburse the discount.
- In the ... per… units fields, enter the number of items per units, which are bought or sold in order to get the reimbursement.
- Select Sold or Purchased, to define whether the reimbursement is paid at purchase or at sale of the items. This option affects the accounting.
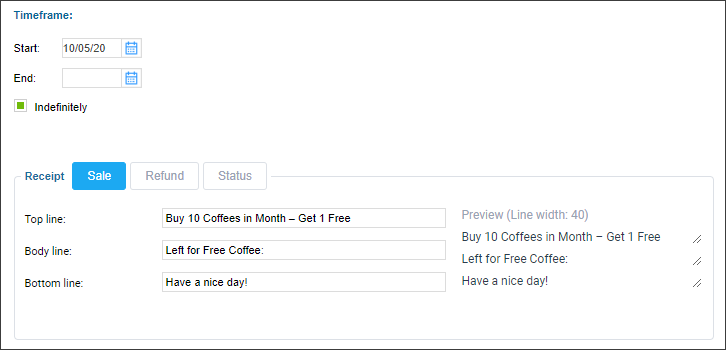
- In the Timeframe section, specify the promotion lifetime settings. Do either of the following:


If you need to set up reimbursements from several vendors, click Add and for each vendor set up the reimbursement settings as described above.

- To create a temporary promotion, in the Start and End fields, specify the dates when the promotion must start and end, respectively.
- To create a promotion without the end date, specify the start date and select the Indefinitely check box.
- In the Receipt section, enter the messages to be printed in the receipt. For each available operation, such as Sale, Refund, and Status, enter the following messages, if needed:
- Top line
- Body line
- Bottom line

- At the top of the promotion form, click Save.


