


- System folders: These folders are created automatically by the system for each newly added document type. For example, you have scanned a store invoice, a fuel invoice, and an expense invoice first time. The system will add corresponding folders automatically as it is shown in the image below.
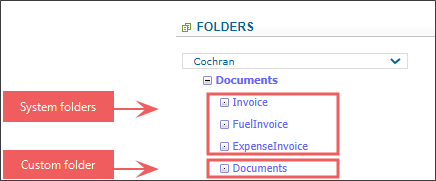
Please note that system folders cannot be neither edited, nor deleted.
- Custom folders: These folders are created manually by the user. For more information about working with custom folders, see Managing Custom Folders in the Docs Explorer Section.

Managing Custom Folders in the Docs Explorer Section
You can perform the following actions with custom folders in the Docs Explorer section:
Creating a New Custom Folder
Before creating a new custom folder, make sure at least one document or invoice was scanned for your location (station).
To create a new custom folder in the Docs Explorer section:
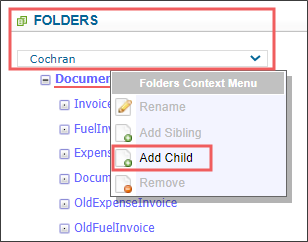
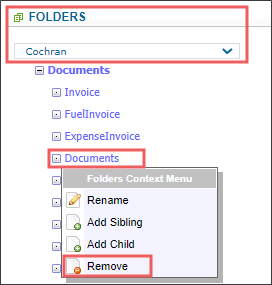
- Below the Folders tab, select the station you need.
- Right-click the Documents folder name.
- In the Folders Context Menu, click Add Child.

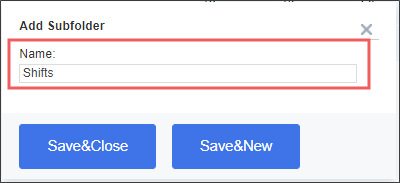
- In the Add Subfolder window:
- In the Name field, enter the new folder's name.
- Click the Save&Close button.

Result: A new folder is displayed in the Documents list.
Renaming the Existing Custom Folder
To rename the existing custom folder in the Docs Scanner:
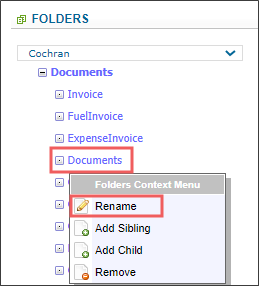
- Below the Folders tab, select the station you need.
- Right-click the Documents folder name.
- In the Folders Context Menu, click Rename.
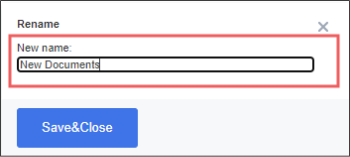
- In the Rename window:
- In the New name field, enter the new folder's name.
- Click the Save&Close button.
Result: The folder is renamed.

Deleting the Existing Custom Folder
To delete the existing custom folder in the Docs Scanner:
- Below the Folders tab, select the station you need.
- Right-click the Documents folder name.
- In the Folders Context Menu, click Remove.
- Confirm deletion.


