


The procedure for installing the Wayne Nucleus cash register includes the following steps:
- Set up the Wayne Nucleus cash register in CStoreOffice®.
- Connect the Wayne Nucleus cash register.
- Log into the Nucleus file share.
- Log into Nucleus via WinSCP.
- Configure the cash register on Master Nucleus.
- Pull the Nucleus Price Book file.
- Map MOP without drop down list.
- Repull shifts from a Nucleus.
Setting up the Wayne Nucleus Cash Register in CStoreOffice®
To set up the Wayne Nucleus cash register in CStoreOffice®:
- From the main CStoreOffice® menu, go to Data Entry > Dashboard > Station Options > Cash Register.
- In the cash register options form:
- Select the Advanced option and set up the following settings:
- In the CR brand list, select Wayne.
- In the CR model list, select Nucleus NAXML_PDI.
- In the Direct Connect Options section > VPN Type list, select Open VPN.


- In the Wayne Nucleus section, set up the following values:
- In the CR IP field, enter 192.168.150.1.
- In the Folders section for all fuel brands, except for Sunoco or Exxon/Mobil, click Set Defaults.
- In case the Sunoco or Exxon/Mobil fuel brand is used, set the following values:
Folder Name Folder Value Sunoco Exxon/Mobil CR Inbox BOSINAX/Import HQ/Import CR Outbox XMLExport XMLExport CR Archive BOSINAX/Import/Archive HQ/Import/Archive 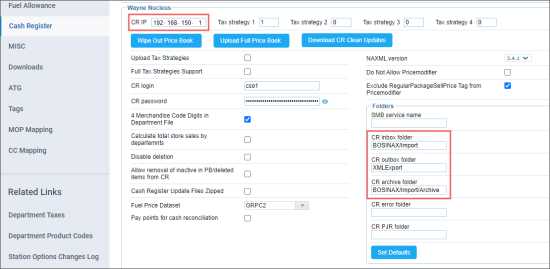

- In the Shared Options section > Default CR product code field, enter 0.

- At the top right of the form, click Save.
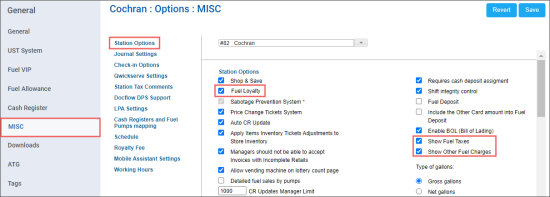
- Switch to the MISC form, to configure the MISC settings. In the MISC form:
- In the Station Options section:

- Select Fuel Loyalty, if needed.
- Select Show Fuel Taxes, if needed.
- Select Show Other Fuel Charges, if needed.

- In the Journal Settings section:
- Select Enable PJR processing, if needed.
- Select Keep Transaction Log Files on CR (DC), if needed.

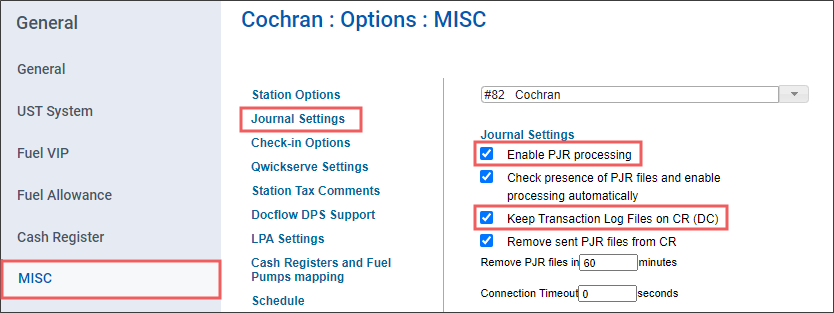
- At the top right of the form, click Save.
Connecting the Wayne Nucleus Cash Register
To connect the Wayne Nucleuscash register:
- Physically connect DC WAN to ISP router. Use a switch, if needed.
- Physically connect DC LAN to Nucleus switch. Typically Cisco/Linksys E1200.
- Verify you can see the Nucleus switch (default is 192.168.1.1):
- ifconfig br0:5 192.168.1.5
- ping 192.168.1.1
- If Nucleus is not the default IP or does not ping, verify all physical connections, than the IP address via the master register, if needed:
- Clock > Programming > System > Machine Configuration
- The IP address listed here is the master Nucleus.
- Set CR IP to 192.168.1.1.
- Set DC LAN and Gateway if CR IP is not 192.168.1.1:
Use the IP from the master Nucleus is if it's not 192.168.1.1.
- Use an IP on the same subnet as the CR IP.
- Ensure the IP is at least 10 digits higher/lower than the CR IP as to not create a conflict with slave registers.
- Reprogram DC box.
Logging into the Nucleus File Share
To log into the Nucleus file share via File Explorer, use the following data:
- File Explorer: \\$DCHostName\d$
- File Explorer for Sunoco or Exxon/Mobil: \\$DCHostName
- User: nucleus_tgt
- Password: ok&42@AUS or $p4C37!m3
Logging into Nucleus via WinSCP
To log into Nucleus via WinSCP, use the following data:
- File protocol: SFTP
- Host name: $DCHostName
- Port number: 222
- User name: BOS_SFTP (if not this, use correct username)
- Password: .ppk SFTP key
- Advanced...
- Authentication
- Private key file
- Click "...".
- Select the correct .ppk key.
- Click Ok.
- Login
Configuring the Cash Register on Master Nucleus
To configure the cash register on Master Nucleus:
- Go to Programming > System > Back Office Configuration.
- Set Back Office Type to NAXML & PDI STD.
- Set Import Frequency to Shift.
- Enable Send PLU/SKU Programming Records.
- Disable Send Check Digit to Back Office.
- Click NAXML Configuration.
- Set NAXML Schema Version to 3.3.3.
- Enable POS Maintenance.
- Enable POS Journal.
- Enable POS Movement.
- Click OK.
- Go to Programming > Reports > Setup > Components.
- Configure Shift Report components.
- Select Shift Report in left column.
- Move the following from the right column to the middle column:
- Bill Accpt Refunds
- Card/Tender Loyalty
- Carwash Sales
- Convert
- Departments
- Discount Sales
- Grade Prod
- Loyalty Sales
- MixNMatch Sales
- MOP Totals
- Non-Fuel Products
- POS Oper Summary
- Price Overrides
- Pump Test Totals
- Ref. Tender Media
- Tank Inventory
- Tendering
- User Time Tracking
- PLU Sales (No Print)
- SKU Total (No Print)
- Reboot Nucleus for configuration to take effect.
- Press the clock icon to return to sales screen.
- Press Report Operations.
- Located to the right of IPT Reset.
- Press Close Day.
- Press IPT Reset, then Continue.
- Press Shutdown.
- If you receive the ...action cannot be completed... error message, click Cancel and try again in one minute.
- Press Restart.
- Once the Nucleus boots back up, close a new Day.
This brings you to a screen where the sales button is in the top left and shutdown is in the top right
- Press Report Operations.
- Press Close Day.
This will close a day shift with a $0.00 balance
- Once the day shift is closed, the register can be used again.
Pulling the Nucleus Price Book File
To pull the Nucleus Price Book file:
- Check \\$DCHostName\d$\Wayne\Config\BosiNax for bosinaxconfig.xml file.
- Save and upload this file to CRM.
MOP Mapping without Drop Down List
For MOP mapping without drop down list:
- Log into station via stf server.
- Change directory to XMLEXPORT.
- Open any .zip shift file.
- Search for 220009.
- Last three digits (minus 00) are the MOP ID:
- Example: 2201TNDTYP00000000000000100, MOP ID is equal to 1.
- Example: 2201TNDTYP00000000000002400 MOP ID is equal to 24.
Repull Shift from a Nucleus
To repull shift from a Nucleus, Level 5 or higher access is needed.
- Click Programming > System > Back Office Configuration.
- Locate Export Report Archives on the bottom of the screen and click it.
- Scroll to the bottom of the window.
- Highlight the shift to be repulled.
- Click Export Shift.
This will display all of the Nucleus's stored shifts.


