


The procedure for installing the Verifone Ruby Standalone cash register includes the following steps:
- Set up the Verifone Ruby Standalone cash register in CStoreOffice®.
- Connect the Verifone Ruby Standalone cash register.
Setting up the Verifone Ruby Standalone Cash Register in CStoreOffice®
To set up the Verifone Ruby Standalone cash register in CStoreOffice®:
- From the main CStoreOffice® menu, go to Data Entry > Dashboard > Station Options > Cash Register.
- In the cash register options form:
- Select the Advanced option and set up the following settings:
- In the CR brand list, select Verifone.
- In the CR model list, select Ruby.
- In the CR data transfer field, make sure DC 401 is selected.
- In the Direct Connect Options section > VPN Type list, select Open VPN.
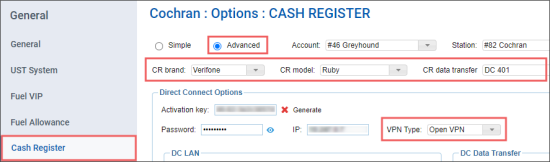

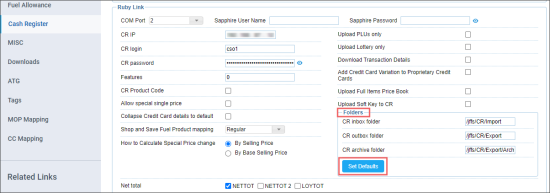
- In the Ruby Link section > Folders subsection, click Set Defaults.

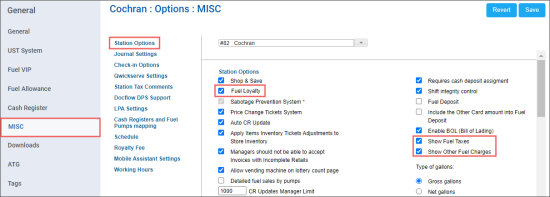
- Switch to the MISC form, to configure the MISC settings. In the MISC form:
- In the Station Options section:
- Select Fuel Loyalty, if needed.
- Select Show Fuel Taxes, if needed.
- Select Show Other Fuel Charges, if needed.

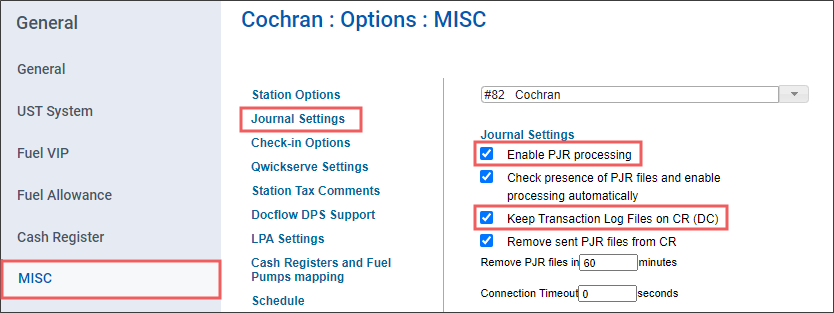
- In the Journal Settings section:
- Select Enable PJR processing, if needed.
- Select Keep Transaction Log Files on CR (DC), if needed.

- At the top right of the form, click Save.
Connecting the Verifone Ruby Standalone Cash Register
To connect the Verifone Ruby Standalone cash register:
- Set PLU Totals on register:
- Exit Sales > Reports > #18.
- Set PLU Tot Config to 1.
- Physically connect DC401 Internet port to ISP router. Use a switch, if needed.
- Connect Ruby adapter to DC401's serial port.
- Connect Ethernet cable to Ruby adapter and Back Office Comm port:
- Typically COMM5
- To verify: print Maintenance Report #27
- Exit out of Sales > Maintenance > #27
- Verify Back Office Comm port. Check bottom of the report for any updates to this Comm port.
- Verify Back Office Interface is set to RubyLink and not GemCom. May be listed as BOInterface or BO_Interface.
- Log into DC401.
- Run the following:
- killall sh
killall ash
rubycom get dep dep.txt - This should return:
CMD: get dep
.....
Done.
If command returns "Read Timeout", check all physical connections and verify DC is plugged into the correct Ruby Comm back office port and that the Back Office Interface is RubyLink, then repeat previous step.
- Reboot DC401 with reboot.
- When DC401 comes back on run top or ps and look for rubycom in the processes list.
- Click Receive Shifts.


