


The procedure for installing the Gilbarco cash register includes the following steps:
- Set up the Gilbarco cash register in CStoreOffice®.
- Connect the Gilbarco cash register.
- Configure the Gilbarco cash register.
- Log into the Passport file share via the file explorer.
- Set up Passport with 2 RV042 Router.
- Repull shifts from Passport.
- Generate the price book file for conversion.
- Generate the VCD request.
- Pull Passport backup.
Setting Up the Gilbarco Cash Register in CStoreOffice®
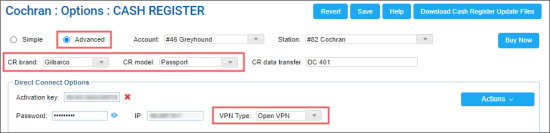
To set up the Gilbarco cash register in CStoreOffice®:
- From the main CStoreOffice® menu, go to Data Entry > Dashboard > Station Options > Cash Register.
- In the cash register options form:
- Select Advanced.
- In the CR brand list, select Gilbarco.
- In the CR model list, select Passport.
- In the Direct Connect Options section > VPN Type list, select Open VPN.

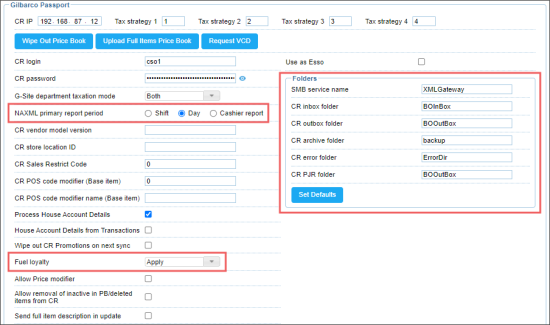
- In the Gilbarco Passport section:
- In the NAXML primary report period field, select Day.
- In the Fuel loyalty list, select Apply.
- In the Folders subsection, click the Set Defaults button.

- At the top right of the form, click Save.
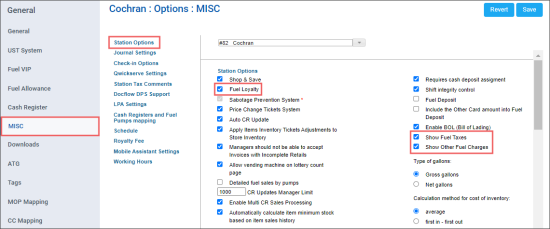
- In the left menu, go to the MISC tab.
- In the MISC tab:
- In the Station Options section:
- Select Fuel Loyalty, if needed.
- Select Show Fuel Taxes, if needed.
- Select Show Other Fuel Charges, if needed.

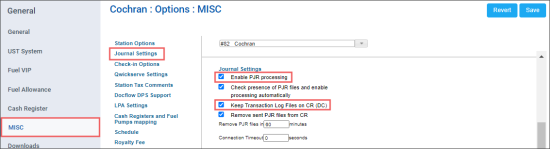
- In the Journal Settings section:
- Select Enable PJR processing, if needed.
- Select Keep Transaction Log Files on CR (DC), if needed.

- At the top right of the MISC tab, click Save.
Connecting the Gilbarco Cash Register
Select your Gilbarco cash register's model from the list below, to view the connection instructions:
- No Firewall
- Cybera SCA-325
- Acumera Firewall
- Sunoco (Fortinet)
- BP (Mako)
- Conoco/Phillips 76 (Hughes/Fortinet)
- ControlScan (Typically Citgo/Gulf)
Connecting the Gilbarco Cash Register with No Firewall
To connect the Gilbarco cash register with No Firewall:
- Connect DC WAN to ISP Router. Use a switch, if needed.
- In CStoreOffice®, configure the following Direct Connect options:
- In the Direct Connect Options section > IP field, enter 10.5.60.1.
- In the Direct Connect Options section > DC LAN subsection:
- In the IP field, enter 10.5.60.15.
- In the Mask list, select 255.255.255.0.
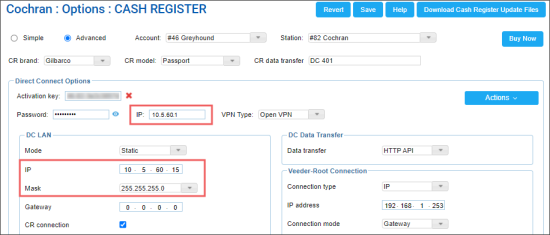

- Connect DC LAN to Cisco RV042's DMZ port.
- Reprogram DC box.
Verify you can see a MAC address on 10.5.60.1.
Connecting the Gilbarco Cash Register with Cybera SCA-325
To connect the Gilbarco cash register with Cybera SCA-325:
- Mind the following Cybera contact information: Phone: 866-429-2372.
- In CStoreOffice®, configure the following Direct Connect options:
- In the Direct Connect Options section > IP field, enter 10.5.48.2.
- In the Direct Connect Options section > DC LAN subsection:
- In the IP field, enter 10.96.10.2.
- In the Mask list, select 255.255.255.0.
- In the Gateway field, enter 10.96.10.1.
-

- Locate the Cybera SCA-325 firewall.
- Connect DC WAN to ISP router. Use a switch, if needed.
- Connect DC LAN to back office port on Cybera SCA-325. Use a switch, if needed.
- Reprogram DC box.
Connecting the Gilbarco Cash Register with Acumera Firewall
To connect the Gilbarco cash register with Acumera Firewall:
- Contact Acumera using the phone number: (512) 687-7401.
- Provide the Site Dealer ID and request the following data:
- LAN IP
- LAN Netmask
- LAN Gateway
- Cash Register IP
- DNS
- Which port to plug into
- In CStoreOffice®, configure the Direct Connect options requested at the step 2:
- DC LAN IP
- DC LAN Mask
- DC LAN Gateway
- CR IP
- Locate Acumera firewall.
- Connect DC WAN to ISP router. Use a switch, if needed.
- Connect DC LAN to Acumera. Use a switch, if needed.
- Reprogram DC box.
DC LAN port to firewall LAN port specified by Acumera.
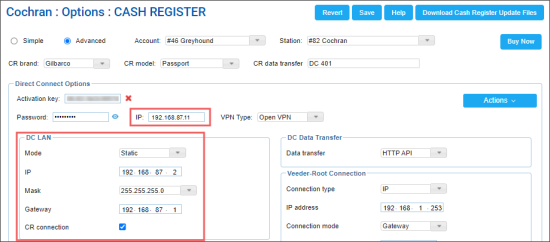
Connecting the Gilbarco Cash Register with Sunoco (Fortinet)
To connect the Gilbarco cash register with Sunoco (Fortinet), configure the following Direct Connect options in CStoreOffice®:
- In the Direct Connect Options section > IP field, enter 192.168.87.11.
- In the Direct Connect Options section > DC LAN subsection:
- In the IP field, enter 192.168.87.2.
- In the Mask list, select 255.255.255.0.
- In the Gateway field, enter 192.168.87.1.

Connecting the Gilbarco Cash Register with BP (Mako)
To connect the Gilbarco cash register with BP (Mako):
- If there is a Cisco/Linksys RV042 on the network:
- Configure the following Direct Connect options in CStoreOffice®:
- In the Direct Connect Options section > IP field, enter 10.5.60.1.
- In the Direct Connect Options section > DC LAN subsection:
- In the IP field, enter 192.168.13.x. X can be anything from 2 to 5.
- In the Mask field, enter 255.255.255.192.
- In the Gateway field, enter 192.168.13.1.

- Locate Mako firewall.
- Connect DC WAN to ISP router. Use a switch, if needed.
- Connect DC LAN to Mako LAN port 3. Use a switch, if needed.
- Reprogram DC Box.
- If there is no Cisco/Linksys RV042 on the network:
- Configure the following Direct Connect options in CStoreOffice®:
- In the Direct Connect Options section > IP field, enter 10.5.48.2.
- In the Direct Connect Options section > DC LAN subsection:
- In the IP field, enter 192.168.13.x. X can be anything from 2 to 5.
- In the Mask field, enter 255.255.255.192.
- In the Gateway field, enter 192.168.13.1.

- Locate Mako firewall.
- Connect DC WAN to ISP router. Use a switch, if needed.
- Connect DC LAN to Mako LAN port 3. Use a switch, if needed.
- Reprogram DC Box.
Connecting the Gilbarco Cash Register with Conoco/Phillips 76 (Hughes/Fortinet)
To connect the Gilbarco Cash Register with Conoco/Phillips 76 (Hughes/Fortinet):
- If using Fortinet Switch model 124E:
- Contact Conoco (Phone: (800) 426-3696), provide the Site Dealer ID and request the following data:
- LAN IP for the back office
- LAN Netmask
- LAN Gateway for the Hughes
- Configure the following Direct Connect options in CStoreOffice®:
- In the Direct Connect Options section > IP field, enter 10.5.48.2.
- In the Direct Connect Options section > DC LAN subsection:
- In the IP field, enter the IP value provided by Conoco.
- In the Mask field, enter the Netmask provided by Conoco (typically 255.255.255.240).
- In the Gateway field, enter the IP provided by Conoco.
- Locate Hughes/Fortinet.
- Connect DC LAN to Hughes/Fortinet.
- Connect DC LAN port to Hughes LAN 3.
- Reprogram DC box.
- If using any other model Fortinet Switch that is not a 124E:
- Contact Conoco (Phone: (800) 426-3696), provide the Site Dealer ID and request the following data:
- LAN IP
- LAN Netmask
- LAN Gateway
- CRIP
- Configure the following Direct Connect options in CStoreOffice®:
- In the Direct Connect Options section > IP field, enter 10.5.48.2.
- In the Direct Connect Options section > DC LAN subsection:
- In the IP field, enter the IP value provided by Conoco.
- In the Mask field, enter the Netmask provided by Conoco (typically 255.255.255.240).
- In the Gateway field, enter the IP provided by Conoco.
- Locate Hughes/Fortinet.
- Connect DC LAN to Hughes/Fortinet.
- Connect DC LAN port to firewall LAN port specified by Conoco (typically LAN 3 of the Hughes router). Use a switch, if needed.
- Reprogram DC box.
Connecting the Gilbarco Cash Register with ControlScan (Typically Citgo/Gulf)
To connect the Gilbarco Cash Register with ControlScan (Typically Citgo/Gulf):
Control Scan contact information:
- Phone: (859) 389-8700 or (800) 393-3246 ext 1
- Email: MNFsupport@controlscan.com
If needed, have them open the "pinhole" in the Meraki/Paysafe/Cradle Point
- With RV042: Open TCP Port 443 from the DC $LANHostName to Gilbarco VLAN 10.5.60.1
- Without RV042: Open TCP Port 443 from the DC $LANHostName to Gilbarco VLAN 10.5.48.2
- If there is a Cisco RV042 router on the network:
- Configure the following Direct Connect options in CStoreOffice®:
- In the Direct Connect Options section > IP field, enter 10.5.60.1.
- In the Direct Connect Options section > DC LAN subsection:
- In the IP field, enter 192.168.41.x. X can be anything from 2 to 254.
- In the Mask field, enter 255.255.255.0.
- In the Gateway field, enter 192.168.41.1.

- Locate Meraki/Paysafe SPG/Cradle Point firewall.
- Connect DC WAN to ISP router. Use a switch, if needed.
- Connect DC LAN to firewall LAN port labelled 1 (or specified port from Control Scan). Use a switch, if needed.
- If there is not a Cisco RV042 router on the network:
- Configure the following Direct Connect options in CStoreOffice®:
- In the Direct Connect Options section > IP field, enter 10.5.48.2.
- In the Direct Connect Options section > DC LAN subsection:
- In the IP field, enter 192.168.41.x. X can be anything from 2 to 254.
- In the Mask field, enter 255.255.255.0.
- In the Gateway field, enter 192.168.41.1.

- Locate Meraki/Paysafe SPG/Cradle Point firewall.
- Connect DC WAN to ISP router. Use a switch, if needed.
- Connect DC LAN to firewall LAN port labelled 1 (or specified port from Control Scan). Use a switch, if needed.
Configuring the Gilbarco Cash Register
To configure the Gilbarco cash register:
- Go to Setup > Store > Back Office > Back Office Interface.
- Set Interface to NACS XML v3.4.
- Open Document tab:
- All XML documents should be marked with an X under both "Store Close" and "Shift Close"
- Do not include anything "by Till"
- Select all of the following under "Generation Options" except:
- Combine Transaction Level (PJR) Files
- Use Manifest
- Open XML Gateway Polling Options tab.
- Set "XML Gateway File Polling" to Enabled.
- Leave username and password blank.
- Set "Path to Pull XML Files From" to C:\Passport\XMLGateway\BOInBox\.
- Set "Path to Push XML Files From" to C:\Passport\XMLGateway\BOOutBox\.
- Open XML File Import Options tab.
- Set The Back Office sends a value of 0 for the base item in the POSCodeModifier tab.
- Process 30 item records and pause for 100 milliseconds (PX-60 models).
- Process 10 item records and pause for 300 milliseconds (older models).
Logging into Passport File Share via File Explorer
To log into Passport file share via file explorer:
- Open the file explorer via the following link: \\$DCHostName
- Enter the following credentials:
- User: passporttech
- Password: 911Tech
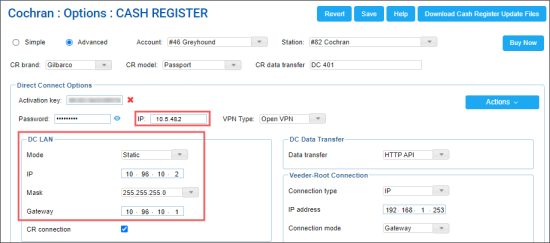
Setting Up Passport with 2 RV042 Router
- DC LAN connects to a secondary RV042's LAN port
- DC LAN IP to 10.5.60.15
- DC LAN Mask to 255.255.255.192
- DC LAN Gateway to 10.5.60.14
Can by any labelled LAN as long as it is not in use
Repulling Shifts from Passport
To repull shifts from Passport:
- Go to Manager Workstation > Setup > Store > Back Office > XML Repoll Files.
- Select Shift Close or Store Close option on the left side of the screen.
- Pick date of recent shift from the calendar. This is the date of the start of the shift.
- Select the shift.
- Select Repoll all configured files on the bottom.
- Click OK on the right.
- Check ...\XMLGateway\BOOutBox for shifts files.
- In CStoreOffice®, click Receive Shifts.
Generating Price Book File for Conversion
To generate price book file for conversion:
- Go to Manager Workstation > Reports > Back Office Reports.
- Select PLU Listing Report.
- Click Print Preview.
Result: The default1.html file is created in the C:\ drive of the Passport. - Check \\$DCHostName\c$ for the file.
- Go to Program Files > Advantage POS > Reports > eng > html.
- Save and upload this file to CRM.
Must be logged in as Owner or another user with owner permissions.
The default1.html file will be the PLU Listing Report file as long as nothing else was created/printed on the register.
Generating VCD Request
To generate VCD request:
- Drop VCD file into ...\XMLGateway\BOInBox.
- Check ...\XMLGateway\BOOutBox.
- Save and upload this file to CRM.
Pulling Passport Backup
To pull Passport backup:
- Check \\$DCHostName\Gilbarco\backup for default.sql file.
- Save and upload this file to CRM.
Previous backups can be found in the archive folder.


