


If you purchase the same item from more than one vendor, you can define vendors with whom you will be trading in the Item form. You can then set up the item cost for each vendor in different locations. When you send updates to distribution channels using the Updates Manager, the specified vendor costs for the item will be stored in the Location and Account Price Books of the subscribers accounts and locations.
To set up vendor data and costs in PIM, you need to perform the following activities:
- Add vendors with whom you will be trading.
- Set up the item costs for locations.
- Send updates to locations.
Adding Vendors
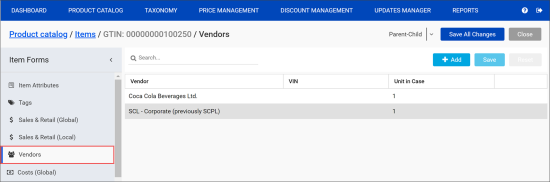
In the Items form, you can add vendors from whom you are planning to purchase the item.
To add vendors of a specific item in PIM:
- Go to Product Catalog > Items.
- In the Items form, use the Find and Replace tool to find the necessary item.
- In the items list, select the item for which you want to add vendors and click Edit.
- In the left menu, select Vendors.
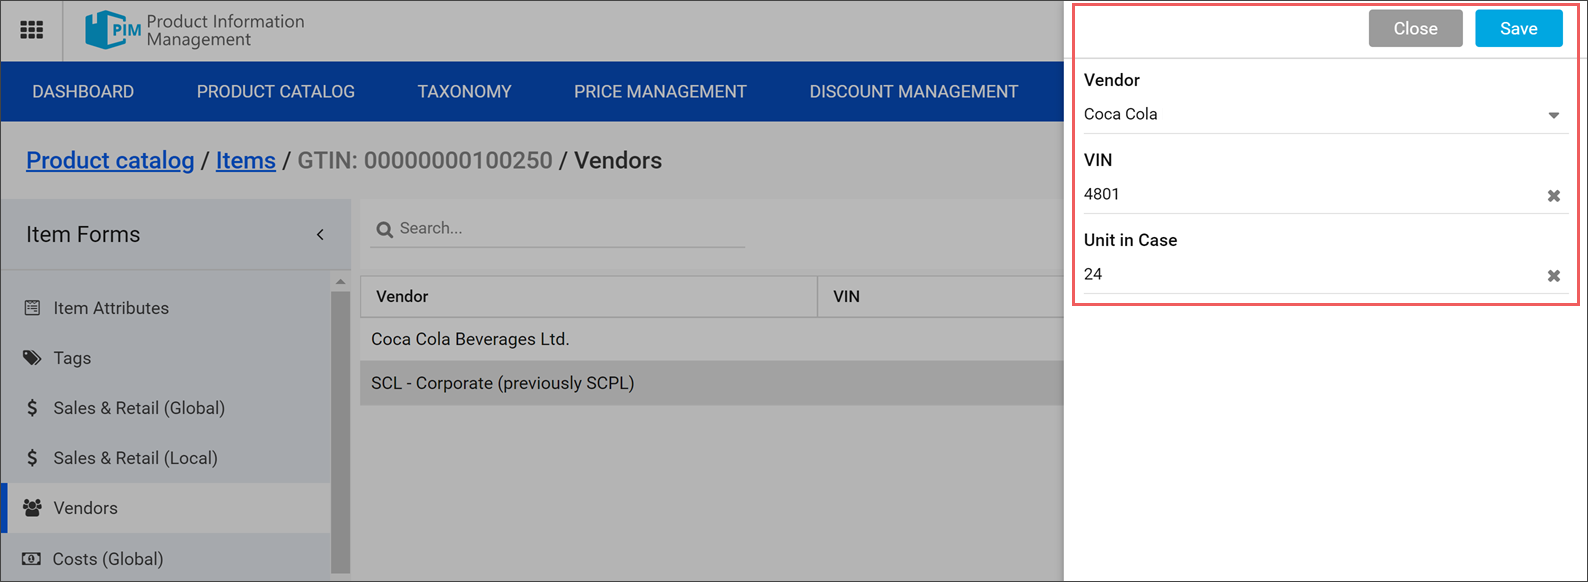
- At the top right corner of the Vendors view, click Add and specify the following settings for the vendor:
- From the Vendor list, select the necessary vendor. To quickly find the vendor, start typing its name in the field. PIM will display all variants matching the entered name.
- In the VIN field, enter the vendor identification number. This is a number that uniquely identifies the item in the vendor's system. The VIN is provided by the vendor.
- In the Unit in Case field, enter the quantity of the item in the packing.
- At the top right corner of the pane, click Save to save the vendor data.

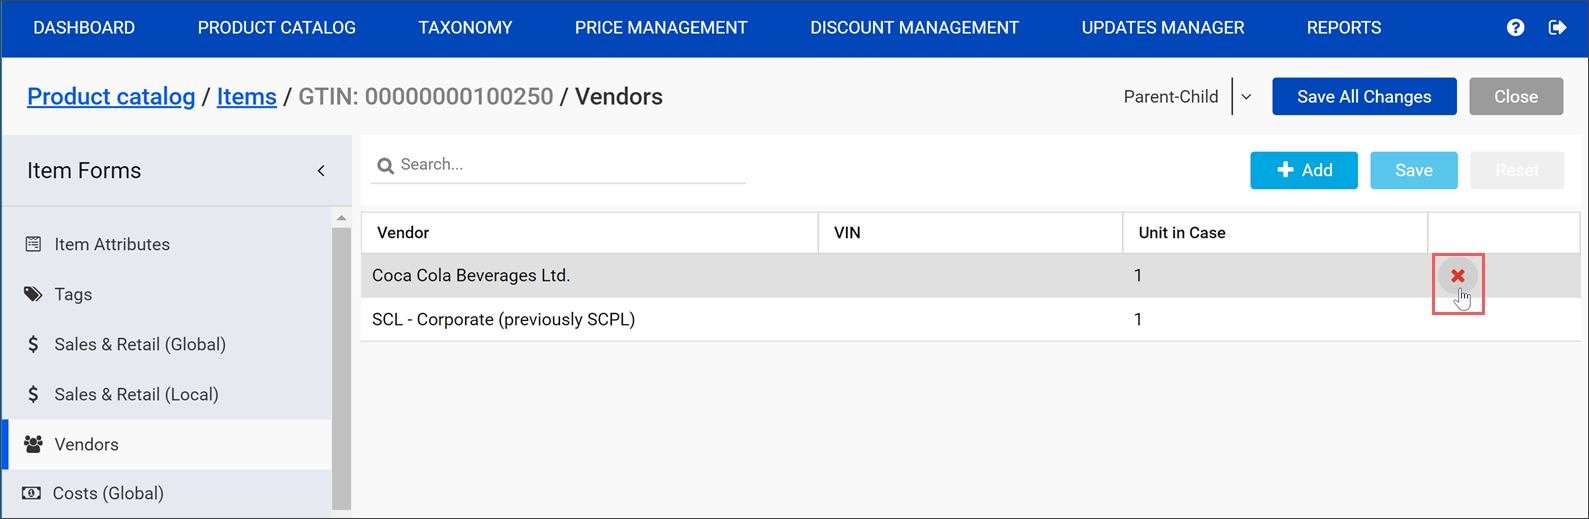
To edit vendor's data, in the vendors list, double-click the vendor and change the settings as required.
To delete a vendor, in the vendors list, hover the cursor over the necessary line and to the right of the line, click the Delete icon. When you delete a vendor, PIM removes all cost values that are already set up in locations for this vendor.
If some subscriber location has invoices from the VIN or vendor, the vendor will not be deleted.
Setting up Item Costs for Locations
You can set up separate cost for an item by a specific vendor for different locations.
To set up the item cost for a location:
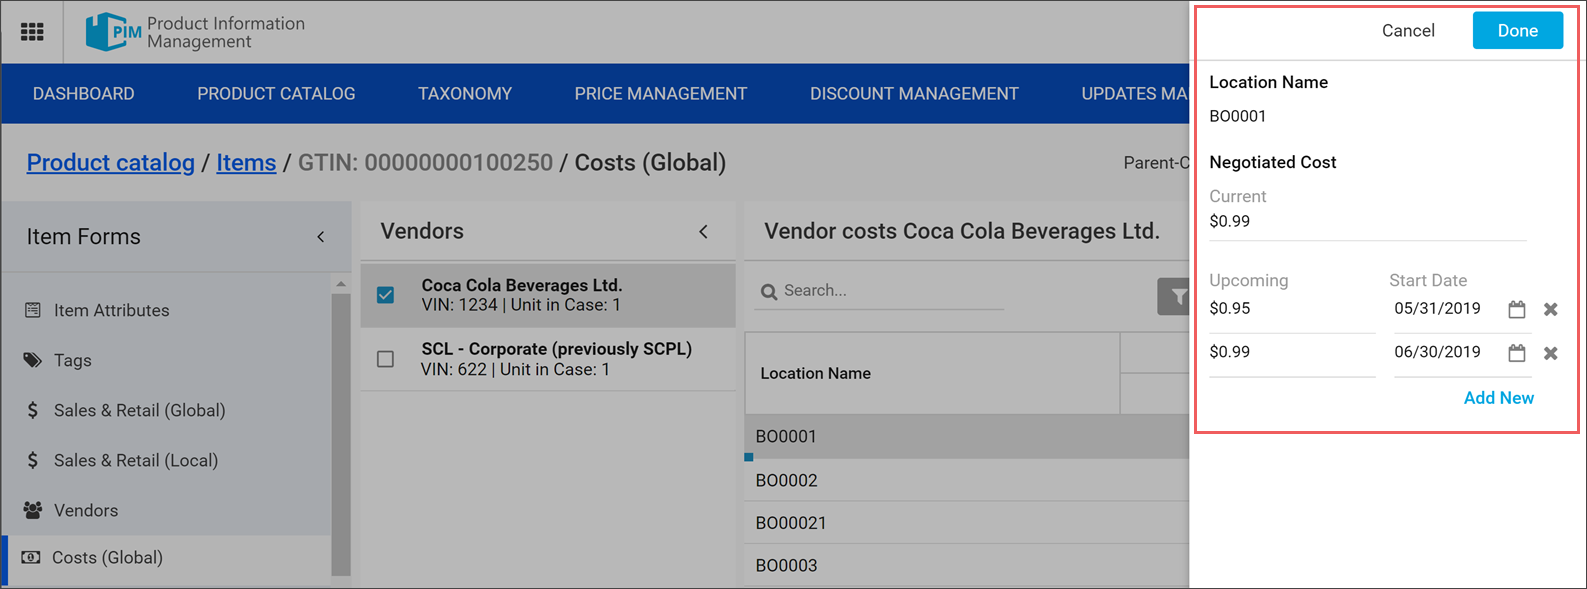
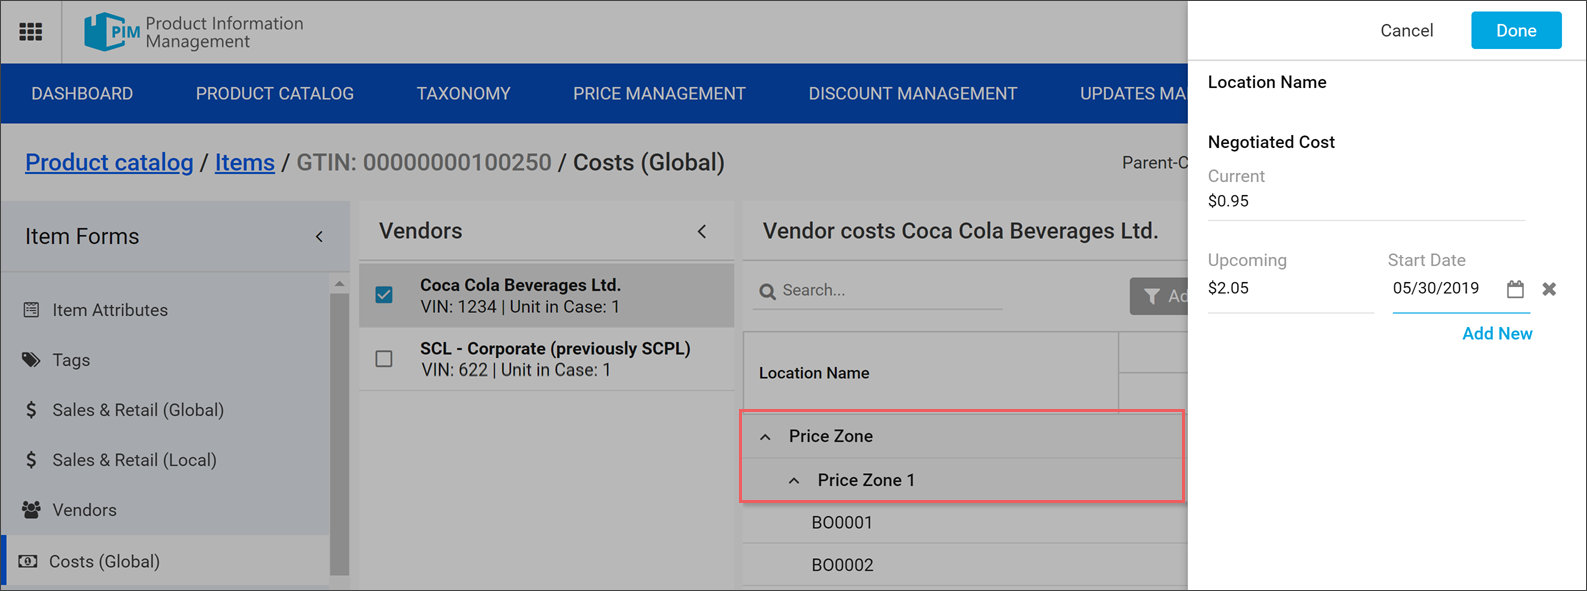
- In the Item form, in the left menu, select Costs (Global).
- In the Vendors list, select the check box next to the vendor whose cost you want to set up.
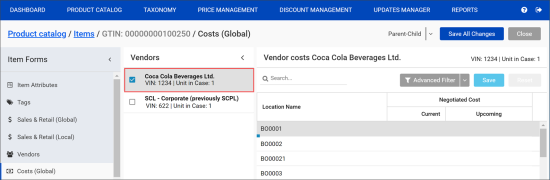
- In the locations list, double-click the location for which you want to set up the cost.
To quickly find the necessary location, use the search field at the top of the locations list or filtering and grouping options. For details, see Filtering and Grouping Locations. - Specify the following cost settings:
- In the Current field, specify the current item cost.
- In the Upcoming field, specify the upcoming cost for the item.
- In the Start Date field, specify the date from which the upcoming cost will be in effect.
- To add one more pair of upcoming cost and date values, at the bottom of the pane, click Add. Then specify the upcoming cost settings as required.
- If the vendor must be set as primary for the location, select the Primary Vendor check box.
- At the top right corner of the pane, click Done to save the cost data.

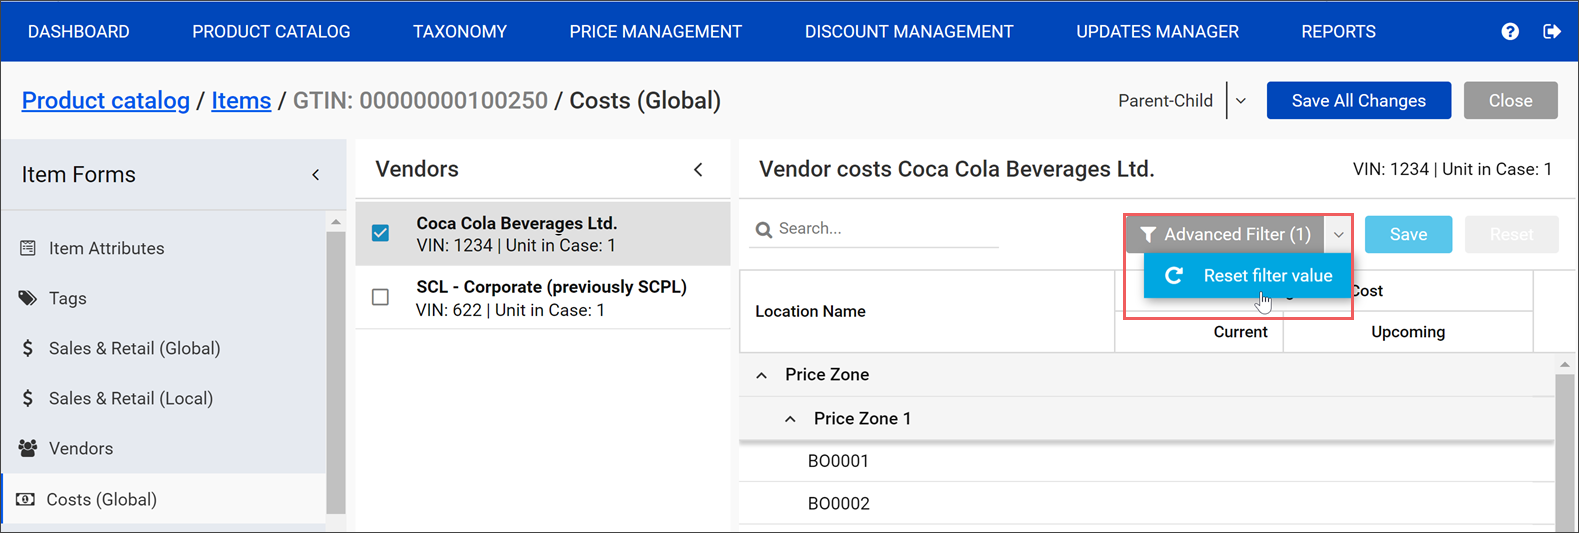
Filtering and Grouping Locations
To facilitate the cost setup, you can:
- Filter locations by one or more location tags: In this case, only locations to which a specific location tag is assigned will be displayed in the locations list.
- Group locations by a location tag: In this case, locations will be displayed as groups in the locations list.
To filter locations by location tags:
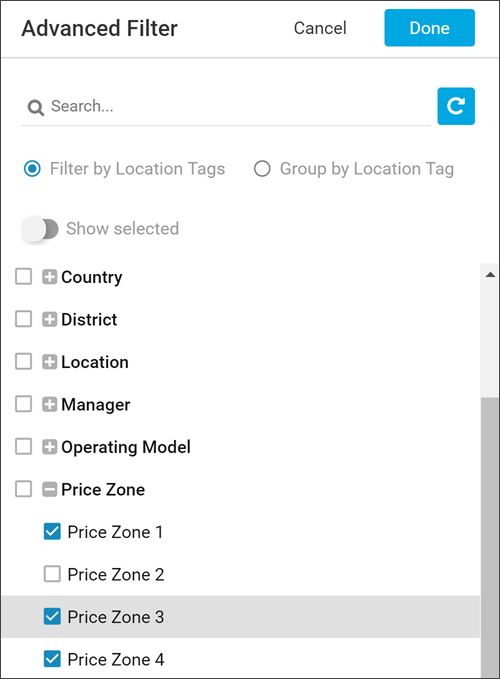
- In the Costs (Global) view, click Advanced Filter.
- In the filter pane, select Filter by Location Tags.
- Select the check boxes next to location tags by which locations must be filtered.
- At the top right corner of the filter pane, click Done to apply the filter.

To group locations by a location tag:
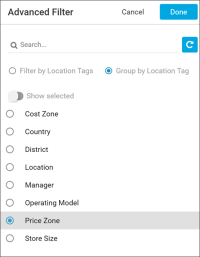
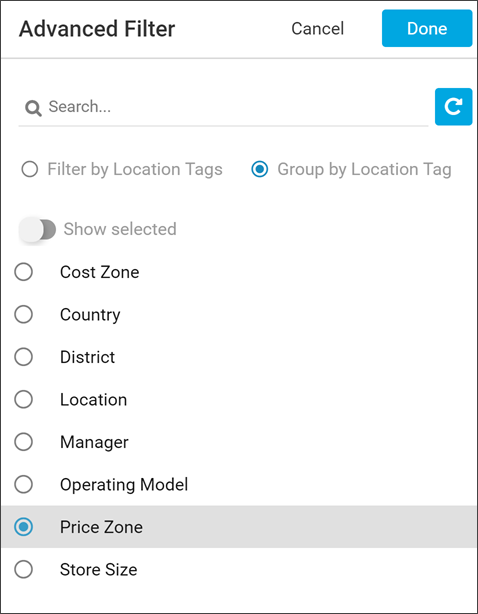
- In the Costs (Global) view, click Advanced Filter.
- In the filter pane, select Group by Location Tag.
- Select the location tag by which locations must be grouped.
- At the top right corner of the filter pane, click Done to apply the filter.
After you have filtered or grouped locations by location tags, you can proceed with cost setup in the usual way: click the necessary location or group in the list and specify the cost settings as required.
To discard the filter, to the right of the Advanced Filter button, click the arrow icon and select Reset filter value.
Sending Updates to Locations
After you set up the vendor data and costs, HO and BO managers need to approve these changes in the Outgoing and Incoming modules of PIM. The changes are then sent to the Updates Manager in CStoreOffice®, where they can be accepted manually or automatically, depending on the CStoreOffice® settings, and further sent to cash registers in subscribers locations.


