


In PIM, you can set up product codes and taxes for items in bulk. This method can be helpful if you need to set up the same product code and taxes for items in a number of locations at once.
For setting up product codes and taxes in bulk, PIM leverages location tags. For example, you have several locations in the same province and need to set up the same tax settings for a specific item in these locations. In this case, you can create a province location tag and categorize your locations using this tag. In PIM, you will be able to select a group of these locations by the location tag and configure the same tax settings for this group simultaneously.
To be able to set up the product codes and taxes for items in bulk, the user must have the CR Department Attribute Management permission.
To set up product codes and taxes for items in bulk, you need to perform the following activities:
- Select one or more items for which you need to set up the product code or taxes.
- Select a location tag by which you want to set up the product code or taxes.
- Set up the product code or taxes by the location tag.
Selecting Items
You need to select items for which you want to set up the product code or taxes. You can set up the product code and taxes for one item or a group of items at once.
To select one or more items for product code and taxes setup:
- Go to Product Catalog > Items Management.
- In the Items pane on the left, click the Add button.
- In the displayed Items form, use the Find tool to find the necessary items.
- In the displayed list of items, select the check boxes next to the items for which you want to set up the product code or taxes.
- At the top right corner of the Items form, click the Append button.
If you want to remove the previously added items from the list in the Items pane, click the Clear and Append button.
- The selected items are added to the list in the Items pane. Select the check boxes next to the items for which you want to set up the product code or taxes.


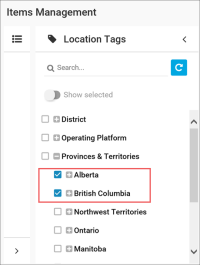
Selecting Locations by Location Tags
After you have added items to the items list, you need to select a location tag by which you want to set up the items product code or taxes.
To select a location tag:
- In the Items Management form, in the Location Tags pane, expand the tags tree.
- Select check boxes next one or more tags by which you want to set up the items product code or taxes.

Setting Up Product Codes and Taxes
To set up the product code or taxes for item(s) by the selected location tag:
- To the right of the Attribute Setup pane, click the Fields to Edit button and select the attribute for which you want to specify values: Taxes to Product Code.
- In the displayed fields, set up the attribute values:
- For product code: in the Product Code field, specify the necessary product code. Only numeric values are supported.
If you want to use the product code specified at the CR department level, select the Default from CR Department check box on the left. - For taxes: in the taxes fields, select the check boxes for taxes that must be applied to the item(s).
If you want to apply taxes specified at the CR department level, select the Default from CR Department check box on the left.
For more details, see Setting Up Taxes and Product Codes for CR Departments.
- At the top right corner of the Items Management form, click the Apply Changes button.
Result: The specified attribute values (product code or taxes) are updated for the selected item(s) in the locations having the selected location tag(s).


