


You can perform the following operations with the transactions in the Account Register form:
- Set up pre-requisites for the transactions list.
- Create a new transaction.
- Update existing transaction.
- Delete existing transaction.
- Filter the transactions list.
Setting Up Pre-Requisites for the Transactions List
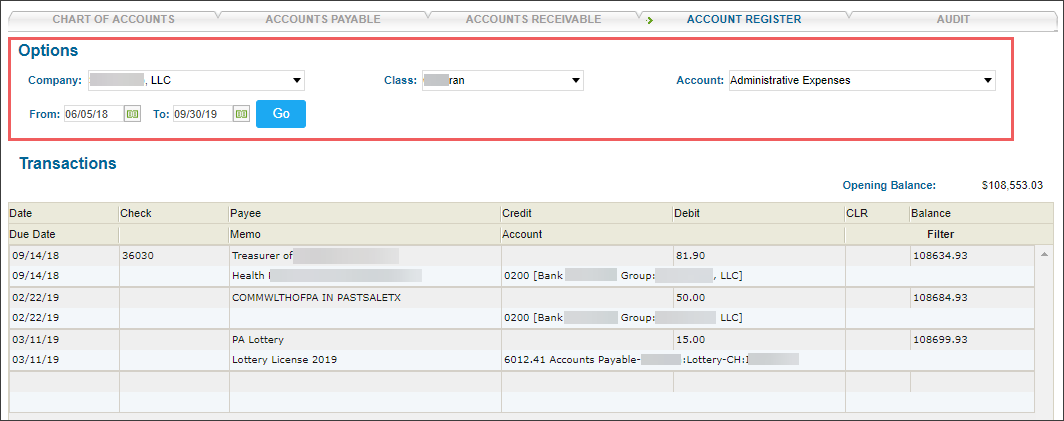
To work with transactions in the Account Register form, you need to set up initial criteria in the Options section.
To set up initial criteria for the transactions list in the Account Register form > the Options section:
- In the Company list, select your company.
- In the Class list, select your station. Depending on the value selected in the Class list, the following logic is applied to the Account list:
- A certain class is selected: The Account list contains accounts with or without this class and with or without selected company.
- No class is selected: The Account list contains accounts without a class and with selected company.
- In the Account list, select an account for which you want to create or get the transactions list.
- In the From and To field, select the period to get the transactions list for.
- Click Go.
Result: The list of existing transactions that matches the selected criteria is displayed.
If the parent account is selected, the transactions list will contain all transactions related to the parent account and all its sub-accounts. For details, see Chart of Accounts.
Creating a New Transaction
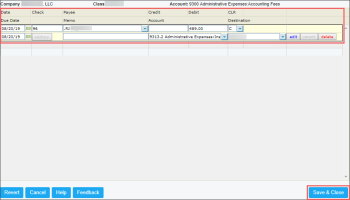
To create a new transaction in the Account Register form:
- In the Options section, set up initial criteria for a new transaction. For details, see Setting Up Pre-Requisites for the Transactions List.
- In the Transactions section, click the first empty row.
Result: The Accounting Transaction form opens in a new window.
- In the Accounting Transaction form, specify the following transaction settings:
- Date: This field is populated automatically by the current date. You can change it, if needed.
- Due Date: Select the transaction due date.
- Payee: Select the payee for the transaction from the list of available payees. The list of available payees is generated based on the selected account for which the transaction is created. For details, see Setting Up Pre-Requisites for the Transactions List.
The following payee types might be displayed: - Customers. For more information on how to manage customers in CStoreOffice®, see Customers.
- Vendors. For more information on how to manage vendors in CStoreOffice®, see Vendors.
- Accounting Vendors
- Data Types. For more information on how to work with the data types in CStoreOffice®, see Adding a New Data Type.
- Memo: Type the comment for the transaction, if needed.
- Account: In the account list:
- Select --Split--, if you need to create the split transactions.
- Select the sub-account of the parent account selected in the Options section of the Account Register form.
- In one of the following fields, enter the amount of money:
- Credit: The amount of money credited to the selected account.
or - Debit: The amount of money debited from the selected account.
- CLR: Select one of the following values:
- R: If you need to mark the transaction as Reconciled, which means that the transaction has cleared the bank and been reconciled.
- C: If you need to mark the transaction as Cleared, which means that the bank knows about your withdrawal or deposit and you confirm the transaction happened.
- Destination: This field is populated automatically with the value selected in the Options section > Class field.
Make sure the transaction date is not equal to the date from the closed audit period.
Make sure you assigned correct vendor type to be able to select it for a specific account.
For example, in case the expenses account is selected in the Options section, you can select from the Payee list only the vendors of the Expenses type. For more information about assigning vendor types, see Setting Up Merchandise Vendors.
- At the bottom right of the Accounting Transaction form, click Save & Close.
You can create several transactions at once for the selected initial criteria. To add one more transaction in the Accounting Transaction form, click the last empty row and specify the transaction settings.
Updating Existing Transaction
To update the existing transaction in the Account Register form:
- In the Options section, set up initial criteria to find the transaction you need to udpate. For details, see Setting Up Pre-Requisites for the Transactions List.
- In the Transactions section, click the transaction you need to edit.
Result: The Accounting Transaction form opens in a new window. - In the Accounting Transaction form:
- Click the transaction you need to edit.
- To the right of the selected transaction, click the edit button.
- Update the transaction settings.
- To the right of the transaction, click the enter button.
- At the bottom right of the Accounting Transaction form, click Save & Close.
Deleting Existing Transaction
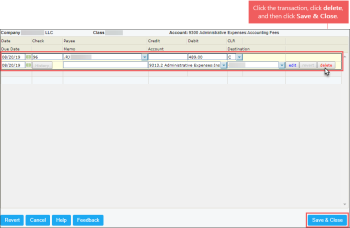
To delete the existing transaction in the Account Register form:
- In the Options section, set up initial criteria to find the transaction you need to delete. For details, see Setting Up Pre-Requisites for the Transactions List.
- In the Transactions section, click the transaction you need to delete.
Result: The Accounting Transaction form opens in a new window. - In the Accounting Transaction form:
- Click the transaction you need to delete.
- To the right of the selected transaction, click the delete button.
- At the bottom right of the Accounting Transaction form, click Save & Close.
Filtering the Transactions List
To work effectively with the transactions list in the Account Register form, you can filter it.
To filter the transactions list in the Account Register form:
- In the Options section, set up initial criteria for a new transaction. For details, see Setting Up Pre-Requisites for the Transactions List.
- To the right of the Transactions table's header, click Filter.
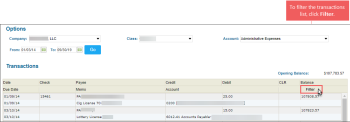
Result: The Account Register Filter form opens in a new window. - In the Account Register Filter form, select one or several filters:
- Direction
- Account
- Payee
- CLR
- Check
Press CTRL to select several items at a time in one filter.
- At the bottom left of the Account Register Filter form, click Apply.
Result: The Account Register Filter form is closed.
The Transactions list in the Account Register form displays only transactions that match the selected filter criteria.


