


When a DC-401 is offline, the following problems occur:
- The location cannot send shifts data to CStoreOffice®.
- CStoreOffice® cannot send Price Book updates to the cash register.
To check the DC-401 status (online or offline):
- Navigate to the CStoreOffice® home page.
- In the left pane, under Cash Register > Shift Reports, find the necessary location. If the connection to DC-401 is missing, the red cross is displayed over the globe icon.
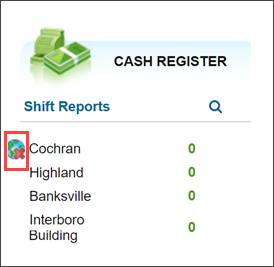
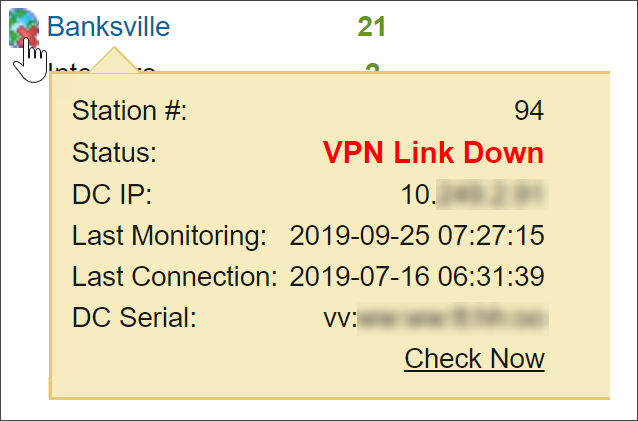
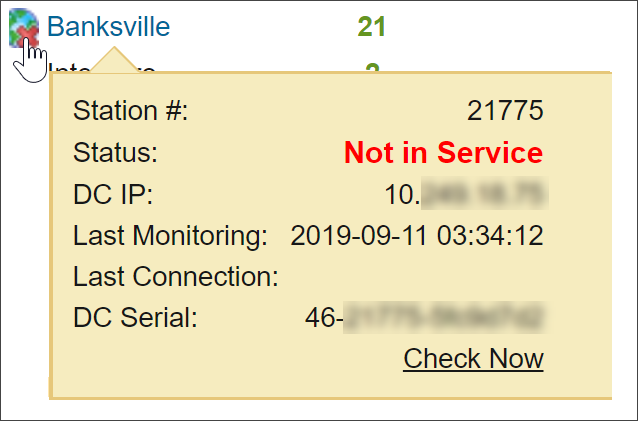
Hover the cursor over the globe icon to view the status of the DC-401 connection and follow the resolution to remedy:
| Issue | Issue Description | Resolution |
|---|---|---|
VPN Link Down
|
The DC box is not connected to the Petrosoft network. | Reboot DC-401 and Check Ethernet Connection
and Check DC-401 Network Connection Settings |
Not in Service
|
The location is not installed yet. This error is used for new sites that have yet to be connected. | Check if the location is installed or not. If yes, click the Check Now link, to launch it in CStoreOffice®. |
CR Service Down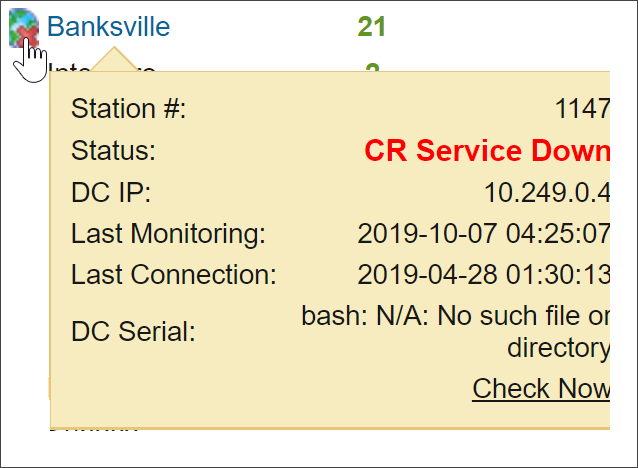
|
- The DC Box CR credentials are invalid (the password at the cash register has changed). - The location has just got online after the VPN Link Down and LAN Link Down errors. |
Verifone registers
The password in CStoreOffice® doesn’t match the password on the POS. CStoreOffice® will need to be updated with the correct password. |
LAN Link Down |
- The Ethernet cable is not plugged to the port at the POS. - The cash register connection settings are incorrect in CStoreOffice®. - The POS is not connected to the correct network zone. - The location has just got online after the VPN Link Down error. |
Reboot DC-401 and Check Ethernet Connection
and Check the cash register configuration in CStoreOffice® and Check the network zone connection |
HTTP API Down
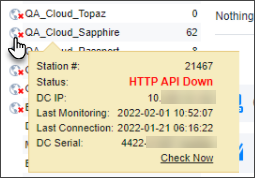
|
The DC box stops sending its monitoring state data to CStoreOffice®. (Applicable to the Verifone and SmartPOS cash registers only). |
Reboot DC-401 and Check Ethernet Connection |
To fix the connection problems, use the scenarios below:
Reboot the DC-401 and Check the Ethernet Connection
This section contains instructions for location or field technicians.
Do the following:
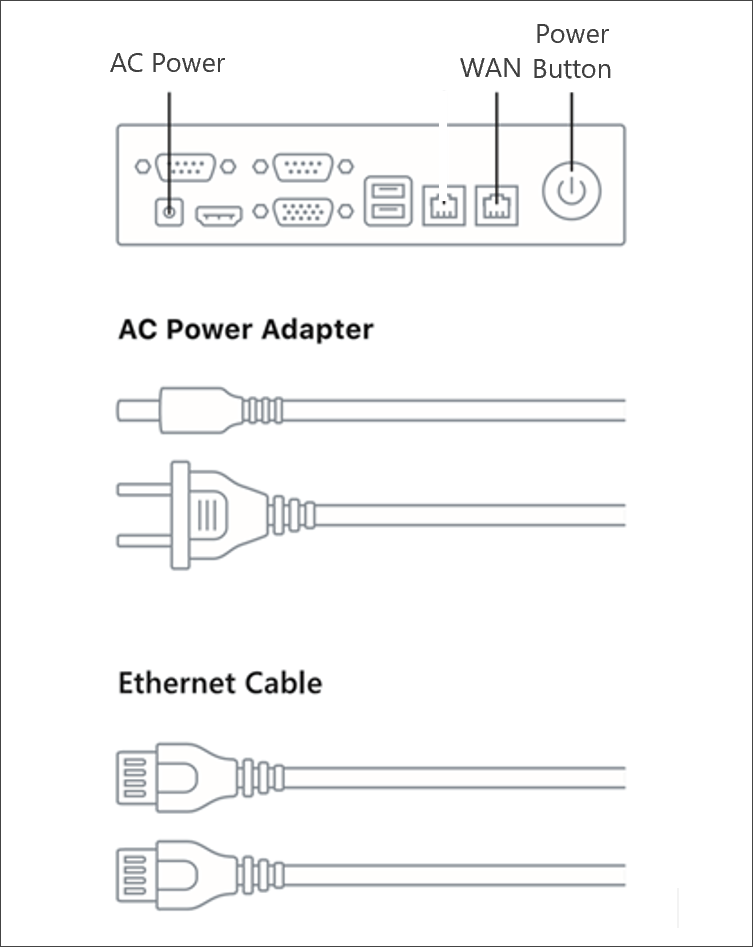
- Verify the power button lights up green on DC-401.
- Yes, the power button lights up green. In this case, move to step 5.
- No, the power button does not light up green. In this case, move to step 2.
- Yes, the AC power adapter is plugged into DC-401 and power. In this case, move to step 4.
- No, the AC power adapter is not plugged into DC-401 or power. In this case, move to step 3.
- Connect DC-401 to power using the AC power adapter.
-
Press the power button to power on DC-401. Wait for 5 minutes. Is the location online?
- Yes, the location is online. In this case, move to step 9.
- No, the location is still offline. In this case, move to step 5.
- Yes, the WAN indicator light is blinking green. In this case, move to step 7.
- No, there is no WAN indicator lights. In this case, move to step 6.
- Yes, the Ethernet cable is plugged in correctly. In this case, move to step 7.
- No, the Ethernet cable is not plugged in. In this case, move to step 10.
- Pull the AC power cable out of DC-401. Wait for 10 seconds.
- Plug the AC power cable back into DC-401. Press the power button to power on DC-401. Wait for 5 minutes.
Is the location online?
- Yes, the location is online. In this case, move to step 9.
- No, the location still offline. In this case, move to step 10.
- In CStoreOffice®, re-pull shift reports. On the CStoreOffice® home page, click the location name under Shift Reports to open the Shift Report form. Next to Pending Shifts, click Receive Shifts.
Are the shift reports pulled into CStoreOffice®?
- Yes, the shift reports are pulled to CStoreOffice®. DC-401 troubleshooting is complete.
- No, the shift reports are not displayed. In this case, move to step 10.
- Move to the Check DC-401 Network Connection Settings instructions.
Check DC-401 Network Connection Settings
This section contains instructions for location or field technicians.
- What setup device do you use to connect to DC-401?
- Mobile device with Wi-Fi (smartphone, tablet, laptop). In this case, move to step 2.
- A computer or laptop with the Ethernet port. In this case, move to step 3.
- Connect to the DC-401 Network in the following way and then move to step 4:
- Open up the camera application on your phone, as if to take a new picture.
- Pan the camera view over the QR code, located on the top of the DC box.
- Accept the prompt that has appeared on your phone to automatically connect to the DC box.
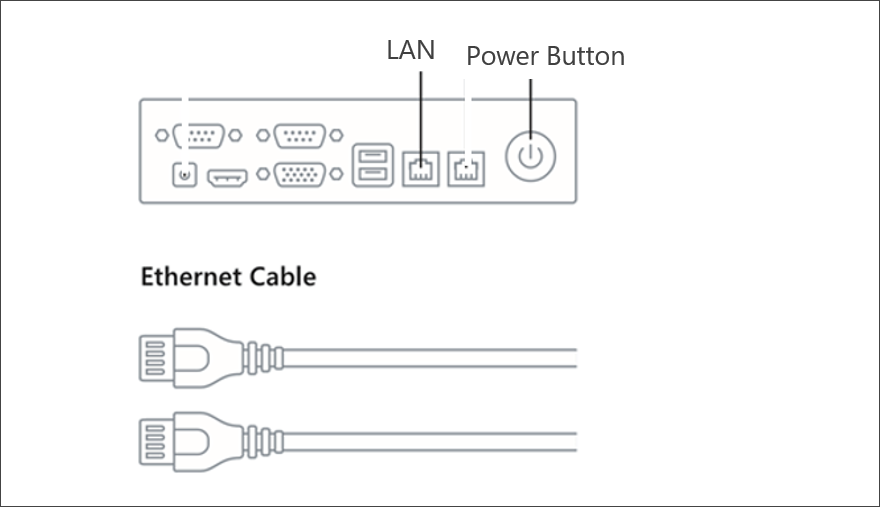
- Connect the computer or laptop to the DC-401 LAN port using the Ethernet cable. Make sure the LAN indicator lights are on.
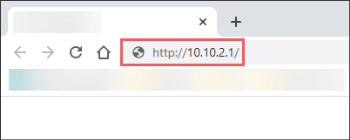
If the DHCP to the computer from DC-401 fails, use the static configuration on the machine of 10.10.2.2, netmask 255.255.255.0 and the gateway of 10.10.2.1.
- Open the browser and navigate to the DC-401 IP address as it is displayed in the image below.
- Validate the network setting by clicking the Test connection button. Is your connection status online?
In case you could not connect to the DC-401 Network following the steps a-c described above, do the following:
Press the power button twice, find the DC-401 Network on the mobile device and connect to it using the password from the sticker or scan the QR code located on the top of the DC-401.

- Yes, the network settings are valid. In this case, move to step 7.
- No, the network settings are invalid. In this case, move to step 6.
- Repeat step 5 and enter the valid settings specific for the location. Move to step 5.
-
Navigate to the POS Settings step and click the Test connection button. Is your connection status online?
(Refer to Activation Guide for visual.)
- Yes, POS settings are valid. In this case, move to step 10.
- No, POS settings are invalid. In this case, move to step 8.
-
(For ITL CV POS only) Check if the POS IP address matches the settings in the activation wizard.
The POS IP address must be +1 digit higher from the gateway IP address.
Example
Gateway: 192.168.1.3
POS IP: 192.168.1.4 - Make the Petrosoft user credentials on the POS:
- Login: Petrosoft (not the admin user)
- Password: P3tr0s0ft4!2
- Log out and log in with Petrosoft credentials on the POS.
- Log in back as the admin user at the POS.
- Set permissions (share) Import and Export folders with the Petrosoft user and give "Full Control".
- (For version earlier than 2.4.2 only) Activate the SMB1 protocol at the POS:
- Run PowerShell as administrator and execute the following command:
Set-ItemProperty -Path "HKLM:\SYSTEM\CurrentControlSet\Services\LanmanServer\Parameters" SMB1 -Type DWORD -Value 1 –Force - Enable SMB 1.0 using the Control Panel: navigate to Control Panel > Programs and Features > Turn Windows features on or off > Enable SMB1.0/CIFS File Sharing Support.
- Restart the POS. Wait for 5 minutes.
- Is the location online?
- In CStoreOffice®, re-pull shift reports. On the CStoreOffice® home page, click the location name under Shift Reports to open the Shift Report form. Next to Pending Shifts, click Receive Shifts.
Are the shift reports pulled into CStoreOffice®?
- Yes, the shift reports are pulled to CStoreOffice®. DC-401 troubleshooting is complete.
- No, the shift reports are not displayed. In this case, move to step 5.


